一张图了解BSD(Berkeley Software Distribution)历史

图片来自wikipedia。
Posts tagged ‘bsd’
等了半年多FreeBSD 7.0-RELEASE终于发布了,正准备用7.0做家里机器的桌面着。
这次升级的新特性(英文):
发表: delphij
时间: 2008/02/28 07:15:32FreeBSD 7.0-RELEASE 正式发布了,这是 7-STABLE 分支的第一个正式的发行版本,同时也是目前第一个以计划而非功能作为优先考虑的奇数版本。这一版本的主要亮点包括:
– 对于 SMP 环境下的数据库以及许多其他性能测试中暴露的可伸缩性问题进行了大幅度的改善。FreeBSD 7.0 在一些用例中,普通负载时性能比 FreeBSD 6.X 提高了 350%,高负载条件下性能提高达 1500%。与目前为止 Linux 内核的最佳性能(2.6.22 和 2.6.24版本)相比,性能高 15%。这些性能改善的结果来自于用于分析和改进系统性能的性能评估用例,对于您具体的工作负载,可能会有所不同。性能方面的改善主要源自以下方面的改 进:
* 默认采用 1:1 线程模型的 libthr 线程库。
* 对于进程间通讯(IPC)、网络和调度器上锁方面的改进。
* 对 5.x 和 6.x 分支所引入的 SMP 架构的优化。一些性能测试显示,这一版本的 FreeBSD 对于至多 8 颗 CPU 的情形,其性能随 CPU 个数线性增加。许多工作负载在多核系统中均呈现了显著的性能提升。
– 对 ULE 调度器进行了大幅度的改进,包括性能和交互式应用响应方面的改良 (4BSD 调度器在 7.0 中仍是默认调度器,但我们有可能在 7.1 中将 ULE 更换为默认调度器)
– 增加了对于 Sun 的 ZFS 文件系统的试验性支持。
– 增加了可用于为文件系统增加数据日志的 gjournal 和用于虚拟化存储的 gvirstor。
– 增加了对 XFS 文件系统的只读支持。
– 对 unionfs 文件系统进行了重写。
– 新增了 iSCSI 发起端(客户端)。
– 针对一些网卡驱动增加了 TSO 和 LRO 支持。
– 新增了对于试验性的 SCTP (流控制传输协议) 的支持(FreeBSD 成为了这一协议的参考实现)。
– 对无线网络 (802.11) 支持进行了大幅度的改进。
– 从 OpenBSD 引入了网络链路聚合/trunking (lagg(4))。
– 为 BPF 增加了即时编译为本地代码的能力,改善了捕捉包的性能。
– 对基于 ARM 架构的嵌入式系统开发板的支持进行了大幅度的改善。
– 引入了新的、具有高可伸缩性的用户态内存分配器 jemalloc。
– 在原先的安装同一版本的安全和可靠性更新的基础上, freebsd-update(8) 正式提供了对于在不同发行版本之间进行二进制升级的支持。
– X.Org 7.3, KDE 3.5.8, GNOME 2.20.2.
– GCC 4.2.1.
– BIND 9.4.2.
FreeBSD Release开发小组正式发布了FreeBSD 6-Stable分支中最新的版本——FreeBSD 6.3-Release,在性能和可靠性上都有了一定的增强。
FreeBSD/i386 6.3-RELEASE 发行说明 FreeBSD 6.3-RELEASE 发行版勘误 下载
另外,FreeBSD 6.3-RELEASE 同时是作为对萩野純一郎博士的纪念版本发布的。萩野純一郎博士在 IPv6 协议栈以及 BSD 系统的其他方面做出了卓越的贡献。
1、FreeBSD 6.3-RC1(下载)已发布。
2、由于在测试过程中发现的问题,决定在7.0发布周期中新增加两个 BETA build:BETA3和BETA4,以便进一步排查问题;FreeBSD 7.0-RELEASE的预计发布时间,由2007年12月17日推迟至2008年1月14日。
如果不出意外,FreeBSD 7.0-BETA3将是RC1之前的最后一个BETA版本。FreeBSD7.0RELEASE估计将在12月中旬发布。
下载地址:
ftp://ftp.FreeBSD.org/pub/FreeBSD/ISO-IMAGES-i386/7.0/7.0-BETA3-i386-disc1.iso
ftp://ftp.FreeBSD.org/pub/FreeBSD/ISO-IMAGES-i386/7.0/7.0-BETA3-i386-disc2.iso
ftp://ftp.FreeBSD.org/pub/FreeBSD/ISO-IMAGES-i386/7.0/7.0-BETA3-i386-bootonly.iso
架设一台代理,提供对外网用户的代理请求,端口仍然为3128,加入Squid认证功能。这样可以保证只提供给某些你信任的用户该服务。架设过程和架设对内网用户提供服务的过程基本相同,只是在编译安装squid时和squid的配置文件squid.conf有些不同。这次架设的服务器将保留对内网用户提供squid服务(内网用户不增加认证功能限制)的同时再增加对外网用户提供squid+认证功能。版本为FreeBSD6.2-RELEASE+Squid2.6-STABLE12。
服务器及网络信息:
外网网卡:em0;外网ip:221.6.117.50/255.255.255.240
内网网卡:em1;内网ip:128.0.0.4/255.255.252.0
架设过程:
一、FreeBSD的安装
1、最小化安装FreeBSD6.2RELEASE
2、配置内核:
jiulongproxynew# cd /usr/src/sys/i386/conf
jiulongproxynew# cp GENERIC funpower
jiulongproxynew# ee funpower
修改内核配置文件,将不需要的选项(如网卡)之类的前面打#,然后按esc并按a保存退出,再执行:
jiulongproxynew# /usr/sbin/config funpower
jiulongproxynew# cd ../compile/funpower
jiulongproxynew# make cleandepend
jiulongproxynew# make depend
jiulongproxynew# make
jiulongproxynew# make install
3、配置/etc/rc.conf:
hostname="jiulongproxynew.jscpu.com"

defaultrouter="221.6.117.97"

ifconfig_em0="inet 221.6.117.50 netmask 255.255.255.240"

ifconfig_em1="inet 128.0.0.4 netmask 255.255.252.0"

sendmail_enable="NONE"

inetd_enable="YES"

linux_enable="YES"

sshd_enable="YES"

usbd_enable="YES"
4、配置resolv.conf:
jiulongproxynew# cd /etc
jiulongproxynew# ee resolv.conf
添加如下两行:
nameserver 221.6.96.177

nameserver 221.6.96.178
5、重启服务器
二、squid的安装
1、安装perl以支持squid
jiulongproxynew# cd /usr/ports/lang/perl5
jiulongproxynew# make install
2、安装Apache,squid认证用户设置密码时使用apache的密码管理程序htpasswd
jiulongproxynew# cd /usr/ports/www/apache13
jiulongproxynew# make install
3、下载并安装squid
从http://www.squid-cache.org/Versions/v2/2.6/下载squid-2.6.STABLE16.tar.gz并通过FTP放置服务器目录中/home/funpower,然后开始解压安装:
jiulongproxynew# cd /home/funpower
jiulongproxynew# tar zxvf squid-2.6.STABLE16.tar.gz
jiulongproxynew# cd squid-2.6.STABLE16
jiulongproxynew# ./configure –prefix=/usr/local/squid –enable-auth=”basic” –enable-basic-auth-helpers=”NCSA”
jiulongproxynew# make
jiulongproxynew# make install
3、配置squid和创建认证用户及密码
将ncsa_auth拷贝至可执行目录/usr/sbin
jiulongproxynew# cd /home/funpower/squid-2.6.STABLE16
jiulongproxynew# cd helpers/basic_auth/NCSA/
jiulongproxynew# cp ncsa_auth /usr/sbin
创建squid认证用户www
jiulongproxynew# /usr/local/bin/htpasswd -c /usr/local/squid/etc/password www
New password:
Re-type new password:
Adding password for user www
输入www两遍密码后出现上面的信息就说明用户创建成功。
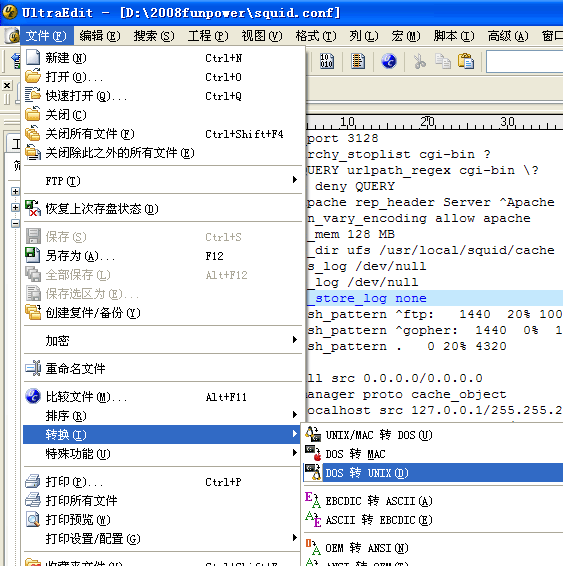
4、配置squid.conf
jiulongproxynew# cd /usr/local/squid/etc
jiulongproxynew# ee squid.conf
内容如下:
auth_param basic program /usr/sbin/ncsa_auth /usr/local/squid/etc/password

auth_param basic children 5

auth_param basic realm Please enter the user name and password

auth_param basic credentialsttl 2 hours
acl web src 128.0.0.0/22  //内网ip段定义

acl all src 0.0.0.0/0.0.0.0  //外网ip段定义

acl all1 proxy_auth REQUIRED  //定义all1字段为需要认证

acl manager proto cache_object

acl localhost src 127.0.0.1/255.255.255.255

acl to_localhost dst 127.0.0.0/8

acl SSL_ports port 443

acl Safe_ports port 80          # http

acl Safe_ports port 21          # ftp

acl Safe_ports port 443         # https

acl Safe_ports port 70          # gopher

acl Safe_ports port 210         # wais

acl Safe_ports port 1025-65535  # unregistered ports

acl Safe_ports port 280         # http-mgmt

acl Safe_ports port 488         # gss-http

acl Safe_ports port 591         # filemaker

acl Safe_ports port 777         # multiling http

acl CONNECT method CONNECT
#deny bbs

acl bbs url_regex -i bbs

http_access deny bbs
#deny baidu post

acl baidupost dstdom_regex post.baidu.com

acl baidupost2 dstdomain post.baidu.com

http_access deny baidupost

http_access deny baidupost2
http_access allow manager localhost

http_access deny manager

http_access deny !Safe_ports

http_access deny CONNECT !SSL_ports

http_access allow web  //定义内网ip段为允许通过

http_access allow all all1  //定义外网ip段为允许通过,但需要认证,因为加了all1字段

icp_access allow all

http_port 3128

http_port 221.6.117.x:3128  //增加一个对本机外网地址的3128端口

hierarchy_stoplist cgi-bin ?

acl QUERY urlpath_regex cgi-bin ?

cache deny QUERY

cache_mem 64 MB

cache_dir ufs /usr/local/squid/cache 7000 16 256

access_log /dev/null

cache_log /dev/null

cache_store_log none

refresh_pattern ^ftp:           1440    20%     10080

refresh_pattern ^gopher:        1440    0%      1440

refresh_pattern .               0       20%     4320

acl apache rep_header Server ^Apache

broken_vary_encoding allow apache

cache_mgr webmaster@jscpu.com

cache_effective_user squid

cache_effective_group squid

visible_hostname jiulongproxynew.jscpu.com
4、创建用户及缓存等:
jiulongproxynew# pw groupadd squid
jiulongproxynew# pw adduser squid -g squid -s /nonexistent
jiulongproxynew# mkdir /usr/local/squid/cache
jiulongproxynew# chown -R squid /usr/local/squid/cache
jiulongproxynew# chgrp -R squid /usr/local/squid/cache
jiulongproxynew# chown -R squid /usr/local/squid/var/logs
jiulongproxynew# chgrp -R squid /usr/local/squid/var/logs
jiulongproxynew# /usr/local/squid/sbin/squid -z
jiulongproxynew# cd /usr/local/squid/sbin
jiulongproxynew# ./squid
jiulongproxynew# ee /etc/rc.local
加入如下一行:
/usr/local/squid/sbin/squid
保存退出。
5、重启服务器
三、客户端的设置及上网演示
1、内网用户
内网用户因为没有增加squid代理的认证功能,所以上网设置不变,只需在IE浏览器中设置服务器内网网卡地址128.0.0.4及3128端口即可。如下图:

2、外网(家庭)用户
外网用户,一般是家中,在使用该代理,需将IE上的代理服务器地址设置为该服务器的外网网卡地址221.6.117.50,端口仍为3128。如下图:

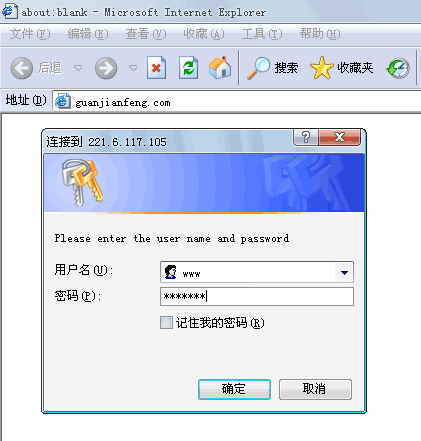
设置完后,在IE上打开任一网址,即会跳出一认证对话框,如下图,输入刚才创建的www用户及密码,若能访问该网站,及该服务器架设正确。
在FreeBSD上安装完squid,squid.conf中添加如下条目可以过滤一些“关键字”和“DOMAIN”:
http_port 3128

hierarchy_stoplist cgi-bin ?

acl QUERY urlpath_regex cgi-bin ?

cache deny QUERY

acl apache rep_header Server ^Apache

broken_vary_encoding allow apache

cache_mem 128 MB

cache_dir ufs /usr/local/squid/cache 1024 16 256

access_log /dev/null

cache_log /dev/null

cache_store_log none

refresh_pattern ^ftp: 1440 20% 10080

refresh_pattern ^gopher: 1440 0% 1440

refresh_pattern . 0 20% 4320

acl all src 0.0.0.0/0.0.0.0

acl web src 172.16.1.0/24 172.16.2.0/24 172.16.3.0/24

acl manager proto cache_object

acl localhost src 127.0.0.1/255.255.255.255

acl to_localhost dst 127.0.0.0/8

acl SSL_ports port 443

acl Safe_ports port 80 # http

acl Safe_ports port 21 # ftp

acl Safe_ports port 443 # https

acl Safe_ports port 70 # gopher

acl Safe_ports port 210 # wais

acl Safe_ports port 1025-65535 # unregistered ports

acl Safe_ports port 280 # http-mgmt

acl Safe_ports port 488 # gss-http

acl Safe_ports port 591 # filemaker

acl Safe_ports port 777 # multiling http

acl CONNECT method CONNECT
#deny bbs

acl bbs url_regex -i bbs //过滤URL中出现"bbs"关键字

http_access deny bbs
#deny baidu post

acl baidupost dstdom_regex post.baidu.com    //过滤post.baiud.com域名

acl baidupost2 dstdomain post.baidu.com    //过滤post.baiud.com域名

http_access deny baidupost

http_access deny baidupost2
#deny qq

acl qq1 dstdom_regex tencent.com    //过滤*.tencent.com域名

acl qq2 dstdom_regex qq.com    //过滤*.qq.com域名

acl qq3 url_regex -i qq    //过滤URL中出现"qq"的关键字

acl qq4 url_regex -i tencent    //过滤URL中出现"tencent"的关键字

acl qq5 dstdomain qq.com    //过滤*.qq.com域名

acl qq6 dstdomain tencent.com    //过滤*.tencent.com域名

acl qqip dst "/usr/local/squid/etc/qq_ip"

http_access deny qq1

http_access deny qq2

http_access deny qq3

http_access deny qq4

http_access deny qq5

http_access deny qq6

http_access deny qqip
http_access allow manager localhost

http_access deny manager

http_access deny !Safe_ports

http_access deny CONNECT !SSL_ports

http_access allow web

http_access deny all
visible_hostname proxy5.jscpu.com

cache_mgr admin@jscpu.com

cache_effective_user squid

cache_effective_group squid

icp_access allow all
二级上网代理服务器,用的很少,不过有时你想控制局域网中一小部分的机器的上网,就用的上。前两天架设了一台二级代理,写个笔记。
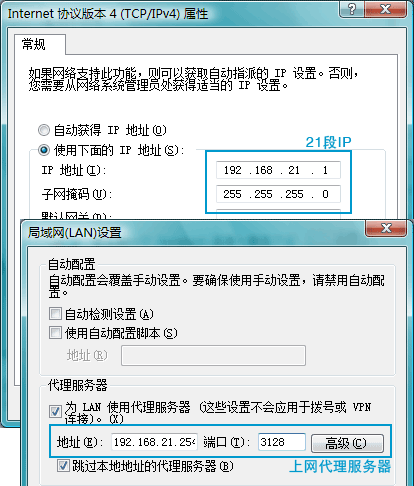
如下图, 一级和二级代理服务器都使用FreeBSD6.2Release+Squid2.6,一级代理直接和外网线路连接,用户通过设置相应的网段IP和代理服务器(IE上设置)进行上网。一级代理服务器后面的交换上的用户直接设置21段的IP再加上在IE上设置192.168.21.254及端口3128进行上网;二级代理后面的用户就要设置11段的IP加上192.168.11.254及端口3128进行上网。

============================================
一、一级代理服务器的架设
说明:
操作系统:FreeBSD6.2Release
代理软件:Squid2.6STABLE16
外网卡:em0 -> 218.90.159.xxx (默认网关为上一级ISP提供)
内网卡:em1 -> 192.168.21.254
1、FreeBSD的安装及优化
(1)最小化安装FreeBSD6.2RELEASE
(2)配置rc.conf
hostname="one.www.com"

defaultrouter="218.90.159.xxx"

 ifconfig_em0="inet 218.90.159.xxx netmask 255.255.255.xxx"  //外网IP

 ifconfig_em1="inet 192.168.21.254 netmask 255.255.255.0"  //内网IP

sendmail_enable="NONE"

inetd_enable="YES"

linux_enable="YES"

sshd_enable="YES"

usbd_enable="YES"
(3)配置内核:
newproxy# cd /usr/src/sys/i386/conf
newproxy# cp GENERIC funpower
newproxy# ee funpower
修改内核配置文件,将不需要的选项(如网卡)之类的前面打#,然后按esc并按a保存退出,再执行:
newproxy# /usr/sbin/config funpower
newproxy# cd ../compile/funpower
newproxy# make cleandepend
newproxy# make depend
newproxy# make
newproxy# make install
2、squid的安装
(1)安装perl
newproxy# cd /usr/ports/lang/perl5
newproxy# make install
(2)下载并安装squid
从http://www.squid-cache.org/Versions/v2/2.6/下载squid-2.6.STABLE16.tar.gz并通过FTP放置服务器目录中/home/funpower,然后开始解压安装:
newproxy# cd /home/funpower
newproxy# tar zxvf squid-2.6.STABLE16.tar.gz
newproxy# cd squid-2.6.STABLE16
newproxy# ./configure –prefix=/usr/local/squid
newproxy# make
newproxy# make install
(3)配置squid.conf
newproxy# cd /usr/local/squid/etc
newproxy# ee squid.conf
内容如下:
acl web src 192.168.21.0/24

acl all src 0.0.0.0/0.0.0.0

acl manager proto cache_object

acl localhost src 127.0.0.1/255.255.255.255

acl to_localhost dst 127.0.0.0/8

acl SSL_ports port 443

acl Safe_ports port 80 # http

acl Safe_ports port 21 # ftp

acl Safe_ports port 443 # https

acl Safe_ports port 70 # gopher

acl Safe_ports port 210 # wais

acl Safe_ports port 1025-65535 # unregistered ports

acl Safe_ports port 280 # http-mgmt

acl Safe_ports port 488 # gss-http

acl Safe_ports port 591 # filemaker

acl Safe_ports port 777 # multiling http

acl CONNECT method CONNECT

http_access allow manager localhost

http_access deny manager

http_access deny !Safe_ports

http_access deny CONNECT !SSL_ports

http_access allow web

http_access deny all

icp_access allow all

http_port 3128

hierarchy_stoplist cgi-bin ?

acl QUERY urlpath_regex cgi-bin ?

cache deny QUERY

cache_mem 64 MB

cache_dir ufs /usr/local/squid/cache 7000 16 256

access_log /dev/null

cache_log /dev/null

cache_store_log none

refresh_pattern ^ftp: 1440 20% 10080

refresh_pattern ^gopher: 1440 0% 1440

refresh_pattern . 0 20% 4320

acl apache rep_header Server ^Apache

broken_vary_encoding allow apache

cache_mgr webmaster@www.com

cache_effective_user squid

cache_effective_group squid

visible_hostname one.www.com
(4)创建用户及缓存等:
newproxy# pw groupadd squid
newproxy# pw adduser squid -g squid -s /nonexistent
newproxy# mkdir /usr/local/squid/cache
newproxy# chown -R squid /usr/local/squid/cache
newproxy# chgrp -R squid /usr/local/squid/cache
newproxy# chown -R squid /usr/local/squid/var/logs
newproxy# chgrp -R squid /usr/local/squid/var/logs
newproxy# /usr/local/squid/sbin/squid -z
newproxy# cd /usr/local/squid/sbin
newproxy# ./squid
newproxy# ee /etc/rc.local
加入如下一行:
/usr/local/squid/sbin/squid
保存退出。
这样一级代理就设置完成,按照下图设置后就能联网络了。
============================================
二、二级代理服务器的架设
下来架设本文的着重点——二级代理,所使用的软件都一样,也是FreeBSD6.2Release+Squid2.6,而且安装FreeBSD的步骤和一级代理的也一样(只有内、外网卡的IP及网关不一样),唯独在配置Squid时配置文件有些不同,具体如下:
说明:
操作系统:FreeBSD6.2Release
代理软件:Squid2.6STABLE16
外网卡:xl0 -> 192.168.21.250 (这里的默认网关就应该是一级代理服务器的内网卡地址,为192.168.21.254)
内网卡:xl1 -> 192.168.11.254
1、安装FreeBSD
安装的具体步骤和上面一级代理的方法一样,只是在配置rc.conf时的IP不一样,如下:
hostname="two.www.com"

 defaultrouter="192.168.21.254"  //一级代理的内网卡地址

 ifconfig_xl0="inet 192.168.21.250 netmask 255.255.255.0"  //外网IP

 ifconfig_xl1="inet 192.168.11.254 netmask 255.255.255.0"  //内网IP

sendmail_enable="NONE"

inetd_enable="YES"

linux_enable="YES"

sshd_enable="YES"

usbd_enable="YES"
2、安装Squid2.6
同样,安装方法和上面一级代理的一样,只是在配置squid的配置文件squid.conf不一样。增加了两行内容,如下:
acl web src 192.168.11.0/24

cache_peer  192.168.21.254  parent  3128  3130  proxy-only  //定义父代理(也就是上一级代理)的IP及上网端口3128

acl all src 0.0.0.0/0.0.0.0

acl manager proto cache_object

acl localhost src 127.0.0.1/255.255.255.255

acl to_localhost dst 127.0.0.0/8

acl SSL_ports port 443

acl Safe_ports port 80 # http

acl Safe_ports port 21 # ftp

acl Safe_ports port 443 # https

acl Safe_ports port 70 # gopher

acl Safe_ports port 210 # wais

acl Safe_ports port 1025-65535 # unregistered ports

acl Safe_ports port 280 # http-mgmt

acl Safe_ports port 488 # gss-http

acl Safe_ports port 591 # filemaker

acl Safe_ports port 777 # multiling http

acl CONNECT method CONNECT

http_access allow manager localhost

http_access deny manager

http_access deny !Safe_ports

http_access deny CONNECT !SSL_ports

http_access allow web

never_direct allow all  //所有请求转发至父代理上

http_access deny all

icp_access allow all

http_port 3128

hierarchy_stoplist cgi-bin ?

acl QUERY urlpath_regex cgi-bin ?

cache deny QUERY

cache_mem 64 MB

cache_dir ufs /usr/local/squid/cache 7000 16 256

access_log /dev/null

cache_log /dev/null

cache_store_log none

refresh_pattern ^ftp: 1440 20% 10080

refresh_pattern ^gopher: 1440 0% 1440

refresh_pattern . 0 20% 4320

acl apache rep_header Server ^Apache

broken_vary_encoding allow apache

cache_mgr webmaster@www.com

cache_effective_user squid

cache_effective_group squid

visible_hostname two.jscpu.com
这样二级代理也架设完成,按照如下的设置二级代理服务器后的用户应该就也可以上网了。

总结:架设二级代理时,个人感觉最重要的还是要搞清楚一、二级代理四块网卡的IP,至于架设方法,和一级代理没啥区别,最主要的是squid.conf中增加了二行内容 。
by funpower, 2007-10-31 23:42。