Archive for the ‘03. 配置笔记’ Category.

squid.conf中过滤“关键字”及“DOMAIN”

在FreeBSD上安装完squid,squid.conf中添加如下条目可以过滤一些“关键字”和“DOMAIN”:

http_port 3128
hierarchy_stoplist cgi-bin ?
acl QUERY urlpath_regex cgi-bin ?
cache deny QUERY
acl apache rep_header Server ^Apache
broken_vary_encoding allow apache
cache_mem 128 MB
cache_dir ufs /usr/local/squid/cache 1024 16 256
access_log /dev/null
cache_log /dev/null
cache_store_log none
refresh_pattern ^ftp: 1440 20% 10080
refresh_pattern ^gopher: 1440 0% 1440
refresh_pattern . 0 20% 4320
acl all src 0.0.0.0/0.0.0.0
acl web src 172.16.1.0/24 172.16.2.0/24 172.16.3.0/24
acl manager proto cache_object
acl localhost src 127.0.0.1/255.255.255.255
acl to_localhost dst 127.0.0.0/8
acl SSL_ports port 443
acl Safe_ports port 80 # http
acl Safe_ports port 21 # ftp
acl Safe_ports port 443 # https
acl Safe_ports port 70 # gopher
acl Safe_ports port 210 # wais
acl Safe_ports port 1025-65535 # unregistered ports
acl Safe_ports port 280 # http-mgmt
acl Safe_ports port 488 # gss-http
acl Safe_ports port 591 # filemaker
acl Safe_ports port 777 # multiling http
acl CONNECT method CONNECT

#deny bbs
acl bbs url_regex -i bbs //过滤URL中出现"bbs"关键字
http_access deny bbs

#deny baidu post
acl baidupost dstdom_regex post.baidu.com //过滤post.baiud.com域名
acl baidupost2 dstdomain post.baidu.com //过滤post.baiud.com域名
http_access deny baidupost
http_access deny baidupost2

#deny qq
acl qq1 dstdom_regex tencent.com //过滤*.tencent.com域名
acl qq2 dstdom_regex qq.com //过滤*.qq.com域名
acl qq3 url_regex -i qq //过滤URL中出现"qq"的关键字
acl qq4 url_regex -i tencent //过滤URL中出现"tencent"的关键字
acl qq5 dstdomain qq.com //过滤*.qq.com域名
acl qq6 dstdomain tencent.com //过滤*.tencent.com域名
acl qqip dst "/usr/local/squid/etc/qq_ip"

http_access deny qq1
http_access deny qq2
http_access deny qq3
http_access deny qq4
http_access deny qq5
http_access deny qq6
http_access deny qqip

http_access allow manager localhost
http_access deny manager
http_access deny !Safe_ports
http_access deny CONNECT !SSL_ports
http_access allow web
http_access deny all

visible_hostname proxy5.jscpu.com
cache_mgr [email protected]
cache_effective_user squid
cache_effective_group squid
icp_access allow all

FreeBSD-6.2Release+Squid-2.6架设上网二级代理服务器

二级上网代理服务器,用的很少,不过有时你想控制局域网中一小部分的机器的上网,就用的上。前两天架设了一台二级代理,写个笔记。

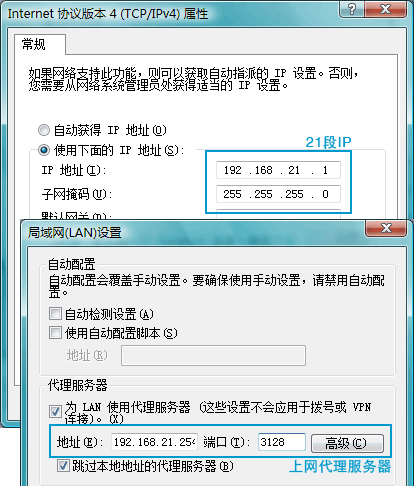
如下图, 一级和二级代理服务器都使用FreeBSD6.2Release+Squid2.6,一级代理直接和外网线路连接,用户通过设置相应的网段IP和代理服务器(IE上设置)进行上网。一级代理服务器后面的交换上的用户直接设置21段的IP再加上在IE上设置192.168.21.254及端口3128进行上网;二级代理后面的用户就要设置11段的IP加上192.168.11.254及端口3128进行上网。

freebsdsquiddeer.gif

============================================

一、一级代理服务器的架设

说明:

操作系统:FreeBSD6.2Release

代理软件:Squid2.6STABLE16

外网卡:em0 -> 218.90.159.xxx (默认网关为上一级ISP提供)

内网卡:em1 -> 192.168.21.254

1、FreeBSD的安装及优化

(1)最小化安装FreeBSD6.2RELEASE

(2)配置rc.conf

hostname="one.www.com"
defaultrouter="218.90.159.xxx"
ifconfig_em0="inet 218.90.159.xxx netmask 255.255.255.xxx" //外网IP
ifconfig_em1="inet 192.168.21.254 netmask 255.255.255.0" //内网IP
sendmail_enable="NONE"
inetd_enable="YES"
linux_enable="YES"
sshd_enable="YES"
usbd_enable="YES"

(3)配置内核:

newproxy# cd /usr/src/sys/i386/conf
newproxy# cp GENERIC funpower
newproxy# ee funpower

修改内核配置文件,将不需要的选项(如网卡)之类的前面打#,然后按esc并按a保存退出,再执行:

newproxy# /usr/sbin/config funpower
newproxy# cd ../compile/funpower
newproxy# make cleandepend
newproxy# make depend
newproxy# make
newproxy# make install

2、squid的安装

(1)安装perl

newproxy# cd /usr/ports/lang/perl5
newproxy# make install

(2)下载并安装squid

从http://www.squid-cache.org/Versions/v2/2.6/下载squid-2.6.STABLE16.tar.gz并通过FTP放置服务器目录中/home/funpower,然后开始解压安装:

newproxy# cd /home/funpower
newproxy# tar zxvf squid-2.6.STABLE16.tar.gz
newproxy# cd squid-2.6.STABLE16
newproxy# ./configure –prefix=/usr/local/squid
newproxy# make
newproxy# make install

(3)配置squid.conf

newproxy# cd /usr/local/squid/etc
newproxy# ee squid.conf

内容如下:

acl web src 192.168.21.0/24
acl all src 0.0.0.0/0.0.0.0
acl manager proto cache_object
acl localhost src 127.0.0.1/255.255.255.255
acl to_localhost dst 127.0.0.0/8
acl SSL_ports port 443
acl Safe_ports port 80 # http
acl Safe_ports port 21 # ftp
acl Safe_ports port 443 # https
acl Safe_ports port 70 # gopher
acl Safe_ports port 210 # wais
acl Safe_ports port 1025-65535 # unregistered ports
acl Safe_ports port 280 # http-mgmt
acl Safe_ports port 488 # gss-http
acl Safe_ports port 591 # filemaker
acl Safe_ports port 777 # multiling http
acl CONNECT method CONNECT
http_access allow manager localhost
http_access deny manager
http_access deny !Safe_ports
http_access deny CONNECT !SSL_ports
http_access allow web
http_access deny all
icp_access allow all
http_port 3128
hierarchy_stoplist cgi-bin ?
acl QUERY urlpath_regex cgi-bin ?
cache deny QUERY
cache_mem 64 MB
cache_dir ufs /usr/local/squid/cache 7000 16 256
access_log /dev/null
cache_log /dev/null
cache_store_log none
refresh_pattern ^ftp: 1440 20% 10080
refresh_pattern ^gopher: 1440 0% 1440
refresh_pattern . 0 20% 4320
acl apache rep_header Server ^Apache
broken_vary_encoding allow apache
cache_mgr [email protected]
cache_effective_user squid
cache_effective_group squid
visible_hostname one.www.com

(4)创建用户及缓存等:

newproxy# pw groupadd squid
newproxy# pw adduser squid -g squid -s /nonexistent
newproxy# mkdir /usr/local/squid/cache
newproxy# chown -R squid /usr/local/squid/cache
newproxy# chgrp -R squid /usr/local/squid/cache
newproxy# chown -R squid /usr/local/squid/var/logs
newproxy# chgrp -R squid /usr/local/squid/var/logs
newproxy# /usr/local/squid/sbin/squid -z
newproxy# cd /usr/local/squid/sbin
newproxy# ./squid
newproxy# ee /etc/rc.local

加入如下一行:

/usr/local/squid/sbin/squid

保存退出。

这样一级代理就设置完成,按照下图设置后就能联网络了。
ipproxyie.gif

============================================

二、二级代理服务器的架设

下来架设本文的着重点——二级代理,所使用的软件都一样,也是FreeBSD6.2Release+Squid2.6,而且安装FreeBSD的步骤和一级代理的也一样(只有内、外网卡的IP及网关不一样),唯独在配置Squid时配置文件有些不同,具体如下:

说明:

操作系统:FreeBSD6.2Release

代理软件:Squid2.6STABLE16

外网卡:xl0 -> 192.168.21.250 (这里的默认网关就应该是一级代理服务器的内网卡地址,为192.168.21.254)

内网卡:xl1 -> 192.168.11.254

1、安装FreeBSD

安装的具体步骤和上面一级代理的方法一样,只是在配置rc.conf时的IP不一样,如下:

hostname="two.www.com"
defaultrouter="192.168.21.254" //一级代理的内网卡地址
ifconfig_xl0="inet 192.168.21.250 netmask 255.255.255.0" //外网IP
ifconfig_xl1="inet 192.168.11.254 netmask 255.255.255.0" //内网IP
sendmail_enable="NONE"
inetd_enable="YES"
linux_enable="YES"
sshd_enable="YES"
usbd_enable="YES"

2、安装Squid2.6

同样,安装方法和上面一级代理的一样,只是在配置squid的配置文件squid.conf不一样。增加了两行内容,如下:

acl web src 192.168.11.0/24
cache_peer 192.168.21.254 parent 3128 3130 proxy-only //定义父代理(也就是上一级代理)的IP及上网端口3128
acl all src 0.0.0.0/0.0.0.0
acl manager proto cache_object
acl localhost src 127.0.0.1/255.255.255.255
acl to_localhost dst 127.0.0.0/8
acl SSL_ports port 443
acl Safe_ports port 80 # http
acl Safe_ports port 21 # ftp
acl Safe_ports port 443 # https
acl Safe_ports port 70 # gopher
acl Safe_ports port 210 # wais
acl Safe_ports port 1025-65535 # unregistered ports
acl Safe_ports port 280 # http-mgmt
acl Safe_ports port 488 # gss-http
acl Safe_ports port 591 # filemaker
acl Safe_ports port 777 # multiling http
acl CONNECT method CONNECT
http_access allow manager localhost
http_access deny manager
http_access deny !Safe_ports
http_access deny CONNECT !SSL_ports
http_access allow web
never_direct allow all //所有请求转发至父代理上
http_access deny all
icp_access allow all
http_port 3128
hierarchy_stoplist cgi-bin ?
acl QUERY urlpath_regex cgi-bin ?
cache deny QUERY
cache_mem 64 MB
cache_dir ufs /usr/local/squid/cache 7000 16 256
access_log /dev/null
cache_log /dev/null
cache_store_log none
refresh_pattern ^ftp: 1440 20% 10080
refresh_pattern ^gopher: 1440 0% 1440
refresh_pattern . 0 20% 4320
acl apache rep_header Server ^Apache
broken_vary_encoding allow apache
cache_mgr [email protected]
cache_effective_user squid
cache_effective_group squid
visible_hostname two.jscpu.com

这样二级代理也架设完成,按照如下的设置二级代理服务器后的用户应该就也可以上网了。
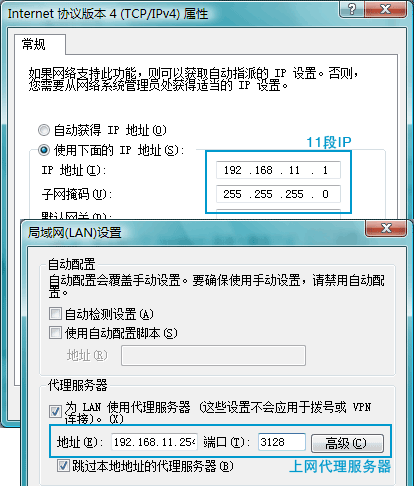
ipproxyie2.gif

总结:架设二级代理时,个人感觉最重要的还是要搞清楚一、二级代理四块网卡的IP,至于架设方法,和一级代理没啥区别,最主要的是squid.conf中增加了二行内容 。

by funpower, 2007-10-31 23:42。

FreeBSD6.2-RELEASE+Squid-2.6.STABLE16代理架设及性能优化笔记[未完]

说明:最近发现几台squid代理在高负载下的性能不是很好,有时甚至造成网络时断时续,所以这次特意重新架设,在架设过程中注重“优化”,这里当然包括操作系统FreeBSD本身的一些优化和代理软件squid的优化。本文只是初步先将代理架设完成,还没完,我将继续对squid进行优化。另外,这次在安装squid的最新稳定版squid-2.6.STABLE16时,发现配置文件中squid.conf中acl那一段放在了最前面,作者应该是考虑到那是必配项,方面使用者配置:)。

logo-red.png

img4.gif

=======================================================

一、FreeBSD的安装及优化

1、最小化安装FreeBSD6.2RELEASE

2、配置内核:

newproxy# cd /usr/src/sys/i386/conf
newproxy# cp GENERIC funpower
newproxy# ee funpower

修改内核配置文件,将不需要的选项(如网卡)之类的前面打#,然后按esc并按a保存退出,再执行:

newproxy# /usr/sbin/config funpower
newproxy# cd ../compile/funpower
newproxy# make cleandepend
newproxy# make depend
newproxy# make
newproxy# make install

3、调整“Mbuf Clusters”

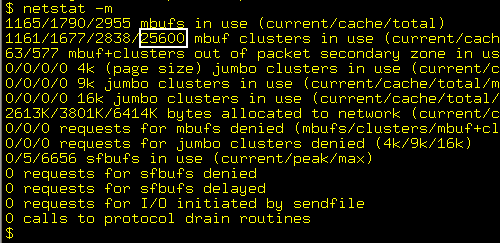
FreeBSD6.2RELEASE默认的Mbuf Clusters的默认值为25600,

bsdsquidnew1.gif

将它修改成51200,执行如下:

newproxy# cd /boot/defaults
newproxy# ee loader.conf

找到#kern.ipc.nmbclusters=””,将其改为kern.ipc.nmbclusters=”51200″,注意将前面的#要去掉,保存退出。

4、调整“临时端口”范围

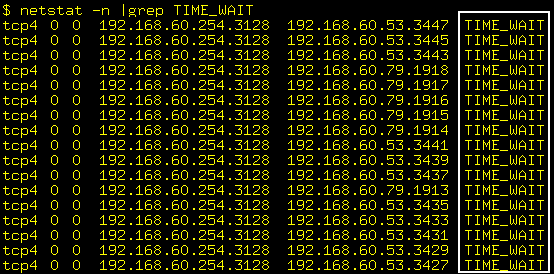
squid要与另一台服务器建立连接,内核就要分配一个临时端口来建立连接,这些临时端口在FreeBSD6.2RELEASE有一个范围,默认为49152–>65535,显然,对于繁忙的服务器,性能将会受到影响。因为一些TCP连接会被它们关闭并进入TIME_WAIT状态,而且当这些连接进入TIME_WAIT状态时,如下图:

bsdsquidnew2.gif

所以对于负载大的服务器(比如每秒有上百个连接)此端口范围应该扩大,将sysctl -w net.inet.ip.portrange.first=30000命令放入/etc/rc.local,就可以将临时端口范围修改为30000–>65535。当然,如果你想调整65535这个数值,就使用net.inet.ip.portrange.last命令。这里我只调整了net.inet.ip.portrange.first的数值。

5、重启机器。

二、squid的安装

1、安装perl

newproxy# cd /usr/ports/lang/perl5
newproxy# make install

2、下载并安装squid

http://www.squid-cache.org/Versions/v2/2.6/下载squid-2.6.STABLE16.tar.gz并通过FTP放置服务器目录中/home/funpower,然后开始解压安装:

newproxy# cd /home/funpower
newproxy# tar zxvf squid-2.6.STABLE16.tar.gz
newproxy# cd squid-2.6.STABLE16
newproxy# ./configure –prefix=/usr/local/squid
newproxy# make
newproxy# make install

3、配置squid.conf

newproxy# cd /usr/local/squid/etc
newproxy# ee squid.conf

内容如下:

acl web src 192.168.60.0/24
acl all src 0.0.0.0/0.0.0.0
acl manager proto cache_object
acl localhost src 127.0.0.1/255.255.255.255
acl to_localhost dst 127.0.0.0/8
acl SSL_ports port 443
acl Safe_ports port 80 # http
acl Safe_ports port 21 # ftp
acl Safe_ports port 443 # https
acl Safe_ports port 70 # gopher
acl Safe_ports port 210 # wais
acl Safe_ports port 1025-65535 # unregistered ports
acl Safe_ports port 280 # http-mgmt
acl Safe_ports port 488 # gss-http
acl Safe_ports port 591 # filemaker
acl Safe_ports port 777 # multiling http
acl CONNECT method CONNECT
http_access allow manager localhost
http_access deny manager
http_access deny !Safe_ports
http_access deny CONNECT !SSL_ports
http_access allow web
http_access deny all
icp_access allow all
http_port 3128
hierarchy_stoplist cgi-bin ?
acl QUERY urlpath_regex cgi-bin ?
cache deny QUERY
cache_mem 64 MB
cache_dir ufs /usr/local/squid/cache 7000 16 256
access_log /dev/null
cache_log /dev/null
cache_store_log none
refresh_pattern ^ftp: 1440 20% 10080
refresh_pattern ^gopher: 1440 0% 1440
refresh_pattern . 0 20% 4320
acl apache rep_header Server ^Apache
broken_vary_encoding allow apache
cache_mgr [email protected]
cache_effective_user squid
cache_effective_group squid
visible_hostname jiulongproxynew.jscpu.com

4、创建用户及缓存等:

newproxy# pw groupadd squid
newproxy# pw adduser squid -g squid -s /nonexistent
newproxy# mkdir /usr/local/squid/cache
newproxy# chown -R squid /usr/local/squid/cache
newproxy# chgrp -R squid /usr/local/squid/cache
newproxy# chown -R squid /usr/local/squid/var/logs
newproxy# chgrp -R squid /usr/local/squid/var/logs
newproxy# /usr/local/squid/sbin/squid -z
newproxy# cd /usr/local/squid/sbin
newproxy# ./squid
newproxy# ee /etc/rc.local

加入如下一行:
/usr/local/squid/sbin/squid
保存退出。

5、优化squid

???

设置锐捷S6506交换机监控端口(一对多监控)

当一个端口需要监控二个以上端口时,就要给交换机设置一对多监控配置了。

以锐捷S6506交换机为例,端口设置为:模块1的2口为监控端口(1/2)、模块1的4口为被监控端口1(1/4)、模块1的16端口为被监控端口2(1/16),操作步骤如下:

s6506> en
Password:
s6506# conf
s6506(config)# no monitor session 1
s6506(config)# monitor session 1 destination interface gig 1/2    //监控端口
s6506(config)# monitor session 1 source interface gig 1/4    //被监控端口1
s6506(config)# monitor session 1 source interface gig 1/16   //被监控端口2
s6506(config)# exit
s6506# wr

extman登陆页面不能显示验证码图片(安装perl_GD模块)

extman的首页能进了,登陆框中的验证码图片又不能显示了,/var/log/httpd-error.log中的错误信息:

[Wed Sep 12 14:20:40 2007] [error] [client 218.104.52.212] Can’t locate GD.pm in @INC (@INC contains: /usr/local/www/extman/libs /usr/local/lib/perl5/5.8.8/BSDPAN
 /usr/local/lib/perl5/site_perl/5.8.8/mach /usr/local/lib/perl5/site_perl/5.8.8
/usr/local/lib/perl5/site_perl /usr/local/lib/perl5/5.8.8/mach
/usr/local/lib/perl5/5.8.8 .) at /usr/local/www/extman/libs/Ext/GD.pm line 14., referer: http://mail.funpower.cn/extman/cgi/index.cgi
[Wed Sep 12 14:20:40 2007] [error] [client 218.104.52.212] BEGIN failed–compilation aborted at /usr/local/www/extman/libs/Ext/GD.pm line 14., referer: http://mail.funpower.cn/extman/cgi/index.cgi

extman的bbs上也有人提出了此问题,原因是perl的GD模块没有正确安装,此GD模块不是PHPINFO中的GD模块,而是Perl上的GD模块,安装如下:

mail# cd /usr/ports/graphics/p5-GD
mail# make install
mail# reboot

重启后,再次登陆,验证图片就显示了,问题解决。

登陆Extman时出现"Can't locate /en_US in @INC"错误

刚刚解决了Extmail登陆的问题,管理模块Extman又登陆不上,错误信息:

Can’t locate /en_US in @INC (@INC contains:
/usr/local/www/extman/libs
/usr/local/lib/perl5/5.8.8/BSDPAN
/usr/local/lib/perl5/site_perl/5.8.8/mach
/usr/local/lib/perl5/site_perl/5.8.8
/usr/local/lib/perl5/site_perl
/usr/local/lib/perl5/5.8.8/mach
/usr/local/lib/perl5/5.8.8 .) at
/usr/local/www/extman/libs/Ext/Lang.pm line 63.

Extmail blog上说是extman的配置文件extman.cf中的语言文件路径输入有错误,可我再三检查了,没问题。一时解决不了,后来想到看apache的错误日志文件,打开/var/log/httpd-error.log,找到了错误信息:

[Wed Sep 12 14:16:55 2007] [error] [client 218.104.52.xxx] /usr/local/www/extman//webman.cf not exists or not readable at /usr/local/www/extman/libs/Ext/Config.pm line 60., referer: http://mail.funpower.cn/extmail/cgi/index.cgi


从上看,路径应该没问题,倒是注意了“or not readable”这话,突然想到会不会是没有读取extman.cf的权限,配置时给这文件是用了chown 600的属性,于是马上将属性改成644:

mail# chown 644 /usr/local/www/extman/extman.cf

问题解决。

在win2003上利用wamp搭建wordpress blog平台

wamp,即windows+apache+mysql+php的组合,利用此平台,配合优秀的blog程序wordpress(中文论坛),就能搭建一个blog。

简单配置过程:

1、登陆http://www3.crsky.com/soft/8264.html下载wordpress的最新版wordpress v2.3beta1,并将解压至网站根目录d:/wordpress下

2、登陆http://www.wampserver.com/dl.php下载wamp5_1.7.2,双击开始安装,使用默认值一路next,在弹出的第一个对话框中选择你的网站根目录,我们这里是d:/wordpress,如下图:

wamp11.gif

接下来按照提示填入域名及管理员邮箱,再选择你的默认浏览器(默认为IE),最后选择启动wamp,点击finish完成。

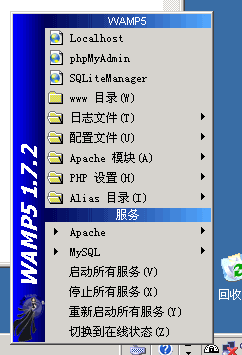
3、配置wamp,将wamp的语言变为中文,如下图。

wamp2.gif

wamp3.gif

4、创建mysql数据库:

1)为了安全先修改数据库的root密码,选择wamp主菜单的“phpmyadmin”,登陆主界面后选择“权限”

wamp4.gif

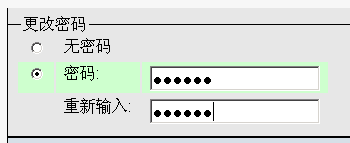
然后编辑root用户,在“更改密码”一栏中设置新的root密码

wamp5.gif

wamp6.gif

然后编辑c:/wamp/phpmyadmin的config.inc.php文件,搜索字段:$cfg[‘Servers’][$i][‘password’] = ‘ ‘; ,在’ ‘中填入刚才设置的root密码。

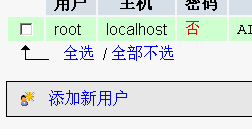
2)创建wordpress所需的数据库,继续访问phpmyadmin,选择“权限”选项,然后选择“添加新用户”,如下。

wamp7.gif

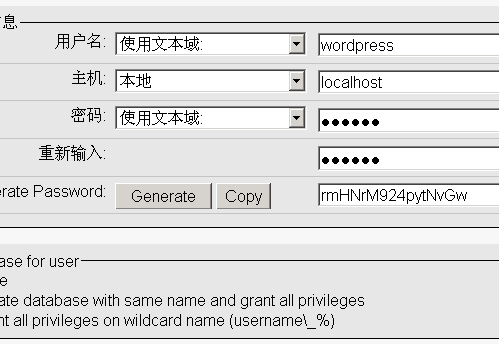
创建用户名为wordpress,再设置相关信息,在Database for user一栏中在“Create database with same name and grant all privileges”选项前打钩,这样就创建一个和用户名一致的数据库wordpress,如下。

wamp8.gif

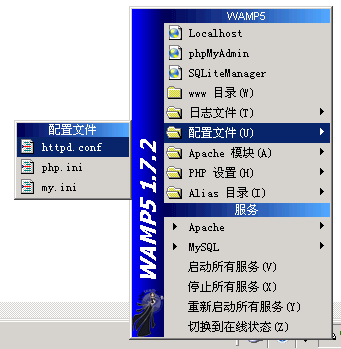
5、配置apache,打开apache配置文件,如下图:

wamp9.gif

将ServerName localhost:80设置为ServerName 218.104.52.55:80,然后修改<Directory “D:/wordpress”>与</Directory>之间的代码,将:

<Directory "D:/wordpress">

#
# Possible values for the Options directive are “None”, “All”,
# or any combination of:
# Indexes Includes FollowSymLinks SymLinksifOwnerMatch ExecCGI MultiViews
#
# Note that “MultiViews” must be named *explicitly* — “Options All”
# doesn’t give it to you.
#
# The Options directive is both complicated and important. Please see
# http://httpd.apache.org/docs/2.2/mod/core.html#options
# for more information.
#
Options Indexes FollowSymLinks

#
# AllowOverride controls what directives may be placed in .htaccess files.
# It can be “All”, “None”, or any combination of the keywords:
# Options FileInfo AuthConfig Limit
#
AllowOverride all

#
# Controls who can get stuff from this server.
#
# onlineoffline tag – don’t remove
Order Deny,Allow
Deny from all
Allow from 127.0.0.1

</Directory>

修改为如下后保存退出。

<Directory "D:/wordpress">
AllowOverride None
Options None
Order allow,deny
Allow from all
</Directory>

6、修改wordpress配置文件wp-config.php,复制wordpress目录下的文件wp-config-sample.php并改名为wp-config.php,使用记事本编辑wp-config.php,填入刚才创建的数据库信息:数据库名(DB_NAME)为wordpress,数据库所属用户名(DB_USER):wordpress,密码(DB_PASSWORD):123456,如下图,编辑完后保存退出。

wamp10.gif

7、打开浏览器,访问http://218.104.52.218,出现如下界面,填入blog名称及你的邮箱,在“Allow my blog to appear in search engines like Google and Technorati.”选项上打钩,然后点击Install WordPress >>按扭

wamp111.gif

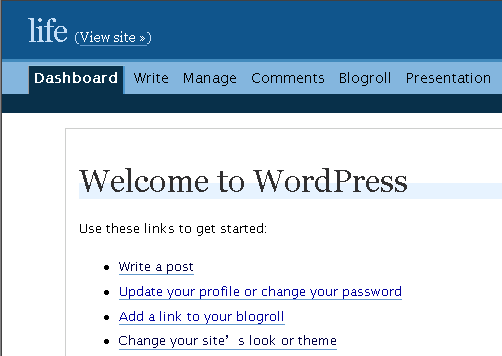
安装就完成了,出现如下界面,记录下随机产生的密码,点击wp-login.php链接,输入用户名admin和记录的密码,登陆wordpress,就能开始你的wordpress blog之旅了。

wamp12.gif

wamp13.gif

wordpress安装很简单,wamp倒是第一次使用,配置中出现了一些问题,不过因为wamp是中文,操作也很傻瓜式,所以很快就解决了。对于新手感觉wamp还是很方便的,可以跳过mysql、php等软件安装过程中的一些配置和关联。

by funpower,2007-09-03 

NOD32杀毒软件导致ASP程序访问变慢

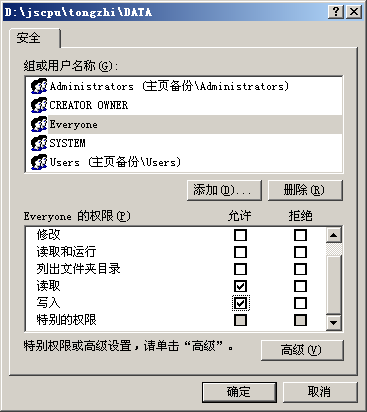
这个问题折腾了我好几天,网站的ASP程序,ASP目录不给“写入”权限时访问很正常,当给ASP程序中数据库目录“写入”权限时就出现问题了:

nod32iis_3.gif

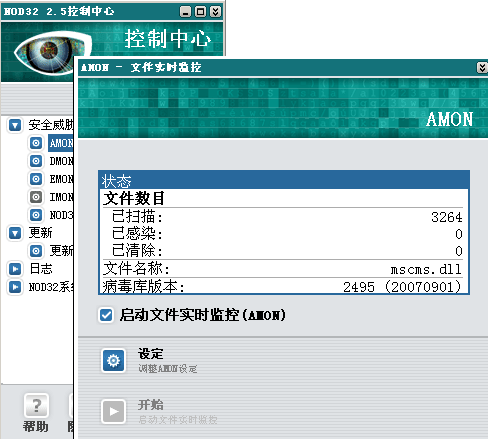
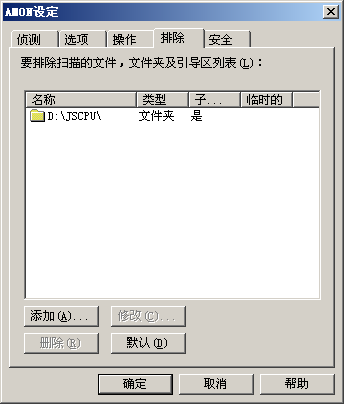
程序可以访问,但是很慢,一开始都以为IIS或者目录权限配置有问题,搞了好长时间问题依旧。最后将杀毒软件NOD32的服务一个个停止再试,在关闭NOD32的AMON(文件实时监控),现象消失了,问题就在这。点击“设定”,将数据库的目录设置为安全目录,问题解决。

nod32iis_1.gif

nod32iis_2.gif

锐捷交换机笔记(三)- system-guard命令参数

system-guard (system-guard的作用)命令参数,简单来说就是通过此命令来限制接在此端口上的设备的TCP连接数目,来达到病毒等危险的控制,RG6506会自动将此设备隔离一段时间,完后再恢复它的连接。

一台RG6506上,模块1上的端口全部使用了system-guard命令参数,负责用户上网的代理服务器刚好也在模块的1/1口上,所以出现的 问题就是网络时断时续,原因就是超出了system-guard设定的参数值,RG6506将接代理服务器的1/1端口给隔离了。

所以将模块上的1/1端口的system-guard命令参数取消,即可。进行如下操作:

jifang6506>en
Password:

jifang6506#conf
Enter configuration commands, one per line. End with CNTL/Z.
jifang6506(config)#int gig 1/1
2007-08-28 15:33:39 @5-CONFIG:Configured from outband
jifang6506(config-if)#no system-guard enable
2007-08-28 15:33:52 @5-CONFIG:Configured from outband
jifang6506(config-if)#no system-guard isolate-time
2007-08-28 15:34:01 @5-CONFIG:Configured from outband
jifang6506(config-if)#no system-guard same-ip-attack-packets
2007-08-28 15:34:16 @5-CONFIG:Configured from outband
jifang6506(config-if)#exit
2007-08-28 15:34:33 @5-CONFIG:Configured from outband
jifang6506(config)#exit
2007-08-28 15:34:34 @5-CONFIG:Configured from outband

jifang6506#wr
Building configuration…
[OK]

锐捷RG-S3760-48交换机调试、安装笔记(二)

1、电口改成光口:

sxl3760>en
sxl3760#conf
sxl3760(config)#int range gi 0/49-52
sxl3760(config)#med fib
sxl3760(config)#exit
sxl3760#write
然后重启。

1、恢复交换机出厂设置:

利用交换机的console口连接至PC的串口,然后

sxl3760>en
sxl3760#delete flash:config.text
sxl3760#delete flash:vlan.dat
然后重启交换机