FreeBSD 5.5-RC1 释出
“ 16 May:
The first and most likely last release candidate of FreeBSD 5.5 is now available.
The RC1 ISO images are available on most of the FreeBSD
Mirror sites. ”
Archive for the ‘01. FreeBSD’ Category.
“ 16 May:
The first and most likely last release candidate of FreeBSD 5.5 is now available.
The RC1 ISO images are available on most of the FreeBSD
Mirror sites. ”
8 May:
FreeBSD 6.1-RELEASE has been released.
Please check the release errata before
installation for any late-breaking news and/or issues with 6.1. The Release Information page has more information about
FreeBSD releases.
离官方2006发布日程表晚了两个月。官方发布页面。
FreeBSD官方发布信息 FreeBSDChina.org发布信息
记得当时安装FreeBSD桌面时从ports安装Openoffice时当时还是一个个从SUN网站上下载下来,然后放入/usr/ports/distfiles中,然后再安装Openoffice的。
距离正式发布时间不远了。
The fourth beta releases of FreeBSD 5.5 and FreeBSD 6.1 are now available.
The respective BETA4 ISO images are available on most of the FreeBSD
Mirror sites.
另刚在solidot.org上看到微软的Windows Vista将在今年11月份上市。
去年末写过<FreeBSD6.0Release+Squid+Socks5服务器架设笔记>, 但对某些用户的上网还没作进一步的限制. 今天完成这项工作.
以下为通过squid的acl语句对上网用户进行限制:
1. 先列出表格:
| ——– | 星期一 | 星期二 | 星期三 | 星期四 | 星期五 | 星期六 | 星期天 |
| 特殊用户 |
00:00-24:00 | 00:00-24:00 | 00:00-24:00 | 00:00-24:00 | 00:00-24:00 | 00:00-24:00 |
00:00-24:00 |
| 用户1 | 8:30-23:00 | 8:30-23:00 | 12:00-23:00 | 8:30-23:00 | 8:30-23:00 | 8:00-21:30 | 8:00-21:30 |
| 用户2 | 14:30-23:00 | 14:30-23:00 | 12:00-23:00 | 14:30-23:00 | 14:30-23:00 | 8:00-21:30 | 8:00-21:30 |
| 用户3 | 16:00-23:00 | 16:00-23:00 | 12:00-23:00 | 16:00-23:00 | 16:00-23:00 | 8:00-21:30 | 8:00-21:30 |
| 用户4 | 16:30-23:00 | 16:30-23:00 | 12:00-23:00 | 16:30-23:00 | 16:30-23:00 | 8:00-21:30 | 8:00-21:30 |
2. 编辑/usr/local/squid/etc/squid.conf文件, 从1475行开始, 加入如下内容:
acl tieshuyonghu src 192.168.121.210/32 192.168.121.211/32 192.168.121.212/32
acl yonghu1 src 192.168.120.1-192.168.120.52/255.255.255.255
acl yonghu2 src 192.168.120.53-192.168.120.104/255.255.255.255
acl yonghu3 src 192.168.120.105-192.168.120.157/255.255.255.255
acl yonghu4 src 192.168.120.158-192.168.120.208/255.255.255.255
acl 8:30-23:00 time MTHF 8:30-23:00
acl 14:30-23:00 time MTHF 14:30-23:00
acl 16:00-23:00 time MTHF 16:00-23:00
acl shan time W 12:00-23:00
acl zm time AS 8:00-21:30
acl all src 0.0.0.0/0.0.0.0
acl manager proto cache_object
acl localhost src 127.0.0.1/255.255.255.255
acl to_localhost dst 127.0.0.0/8
acl SSL_ports port 443 563
acl Safe_ports port 80 # http
acl Safe_ports port 21 # ftp
acl Safe_ports port 443 563 # https, snews
acl Safe_ports port 70 # gopher
acl Safe_ports port 210 # wais
acl Safe_ports port 1025-65535 # unregistered ports
acl Safe_ports port 280 # http-mgmt
acl Safe_ports port 488 # gss-http
acl Safe_ports port 591  
; # filemaker
acl Safe_ports port 777 # multiling http
acl CONNECT method CONNECT
http_access allow manager localhost
http_access deny manager
http_access deny !Safe_ports
http_access deny CONNECT !SSL_ports
http_access allow tieshuyonghu
http_access allow yonghu1 8:30-23:00
http_access allow yonghu1 shan
http_access allow yonghu2 14:30-23:00
http_access allow yonghu2 shan
http_access allow yonghu3 16:00-23:00
http_access allow yonghu3 shan
http_access allow yonghu3 zm
http_access allow yonghu4 16:30-23:00
http_access allow yonghu4 shan
http_access allow yonghu4 zm
http_access deny all
这里利用了squid的acl中的src和time两个标签, time对星期的表示为 S-Sunday(星期天) M-Monday(星期一) T-Tuesday(星期二) W-Wednesday(星期三) H-Thursday(星期四) F-Friday(星期五) A-Saturday(星期六), 对acl更多的信息可看这里.
按照去年发布的FreeBSD06年发布日程表,FreeBSD6.1应该是在3月20日左右发布。
FreeBSD 发布工程组的 Scott Long ,在给 FreeBSD-current 邮件列表的投稿中,提出了 2006 年 FreeBSD 的发布日程表:
- 3月20日:发布 FreeBSD 6.1
- 4月3日:发布 FreeBSD 5.5
- 7月31日:发布 FreeBSD 6.2
- 12月11日:发布 FreeBSD 6.3
邮件中还提到,准备在2007年6月发布 FreeBSD 7.0。
今年 FreeBSD 共发布了3个版本: 4.11、5.4 和 6.0 。
过年时上过几次网,看到很多关于freebsd.org被封的消息,今天第一天上班,打开http://cnsnap.cn.freebsd.org/zh_CN/可以,就试着找开http://www.freebsd.org,也可以,是解封了?还是其它原因?我这提供商:江苏无锡ADSL
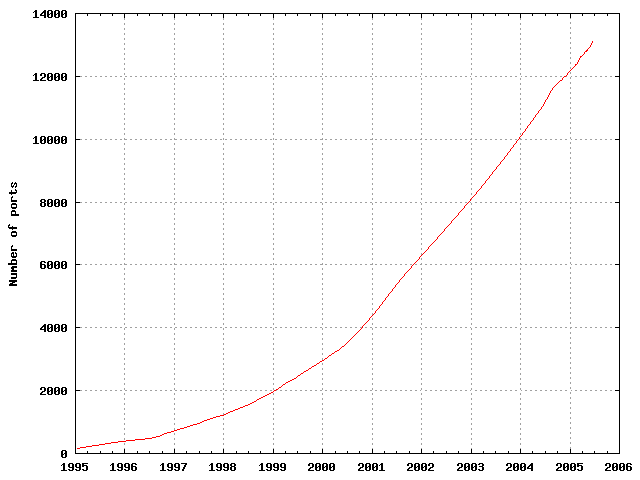
您可以继续使用 “传统的”方式安装软件。 然而, FreeBSD 提供了两种技术: packages 和 ports。 就在写这篇文章的时候, 已经有超过
13,300 个第三方的应用程序可以使用了。一个FreeBSD的ports是一个可以自动从源代码编译成应用程序的文件集合。
记住,如果您自己来编译的话,需要执行很多步的操作 (解压, 补丁, 编译, 安装)。这些整理 port 的文件集合包含了系统需要完成这个工作的必需信息。
您可以运行一些简单的命令,那些源代码就可以自动地下载, 解开, 打补丁, 编译, 直至安装完成。Ports 的优点
package 在编译时通常使用比较保守的选项, 这是为了保证它们能够运行在大多数的系统上。通过从 port 安装,
您可以细微调整编译选项来产生适合于处理器的代码 (针对于 Pentium IV 或 AMD 的 Athlon CPU)。一些软件包已经把与它们相关的能做和不能做的事情的选项都编译进去了。 例如, Apache
可能就配置了很多的选项。 从 port 中安装时,您不一定要接受默认的选项, 可以自己来设置。在一些例子中,一个软件有不同的配置存在多个package。 例如, Ghostscript存在 ghostscript package 和 ghostscript-nox11 package两个配置package,这取决于您是否安装了X11服务器。
这样的调整对package是可能的,但如果一个应用程序有超过一个或两个不同的编译时间选项时, 就不行了。一些软件的许可条件禁止采用二进制形式发行。 它们必须带上源代码。
一些人不信任二进制发行形式。 至少有了源代码, (理论上) 可以亲自阅读它,寻找潜在的问题。
如果您要自己对软件打补丁,您就需要有源代码。
一些人喜欢整天围着源代码转, 所以他们喜欢亲自阅读源代码, 修改源代码等等。
保持更新 ports, 订阅邮件列表 FreeBSD ports 邮件列表 和递交错误报告 FreeBSD ports bugs 邮件列表。
警告: 安装任何应用程序之前, 应首先检查 http://vuxml.freebsd.org/ 上是否有关于您所安装的应用程序的安全问题报告。
您也可以安装 security/portaudit, 它能够自动地检查已经安装的应用程序的漏洞;此外,
在您安装程序之前它也会首先检查是否存在已知的漏洞。 另外, 您也可以使用 portaudit -F -a
这个命令在安装了某个软件包之后作出检查。——来自《FreeBSD
使用手册》
一般ports目录位于freebsd的/usr目录下。在我的《FreeBSD6.0Release+Squid+Socks5服务器架设笔记》一文中,socks5服务就是使用ports安装方式。
五、安装socks5服务
1、下载并安装socks5
从北大天网上下载socks5-v1.0r11.tar.gz,大小为401.093KB(我提供的这个就是),然后通过FTP拷贝到服务器上,然后:
#
cd /home/funpower
# cp socks5-v1.0r11.tar.gz
/usr/ports/distfiles<查看distinfo>
# cd
/usr/ports/net/socks5
#more distinfo
显示如下:
MD5 (socks5-v1.0r11.tar.gz)
= 9d6db7d3c425bbafb8c8d67e128eedfe
SIZE (socks5-v1.0r11.tar.gz) =
401093
查看SIZE的大小是否和刚才下载的大小一样(401.093KB)<开始安装>
# cd /usr/ports/net/socks5
#
make install
DragonFly BSD 1.4.0 已经被发布。根据其版本注释,新版本的变更包括吸收了NetBSD 的 pkgsrc 和 Citrus 等成果,其引人注意的特征还包括引入了独自的NTPD等。DragonFly BSD 1.4.0 不支持 FreeBSD 的 ports 系统。 — 消息来自ChinaUnix.net
 它是从FreeBSD4-STABLE分支出来的一个项目,侧重于轻量级但能高效能的及多处理器支持的一个操作系统。维基中文百科上写到:
DragonflyBSD脫胎自FreeBSD4系列。
由於FreeBSD team將於FreeBSD4.11後不再推出新的4系列版本(僅做安全性更新),而新的FreeBSD 5系列初期又有效能及穩定性等等的質疑,因此部分社群成員變另外成立分支計劃,是為DragonflyBSD。另外DragonflyBSD吸收了一些在FreeBSD 5不採用的構想,因此不少人認為DragonflyBSD前途大有可為。
架设此服务器,使客户端通过设置代理服务器的squid来浏览网页,通过代理服务器的socks5来使用QQ、MSN、证券等服务,下面简单介绍服务器的架设过程。
从ftp://ftp.freebsd.org/pub/FreeBSD/torrents/6.0-RELEASE下载最新版本FreeBSD6.0Release刻成光盘并选择最小化安装(安装时开通ftp及ssh服务)。
网络信息:
网段 -> 192.168.10.0/24
fxp0 -> 内网网卡 192.168.10.254
em0 -> 外网网卡 218.104.52.x/32
1、选择软件包时选择最小化安装。
2、编辑inetd.conf时开通ftp及telnet服务。
其它的都默认安装,具体可参考这,安装完后重启机器。
二、配置freebsd
1、配置/etc/rc.conf:
hostname="jifangproxy.jscpu.com"
defaultrouter="218.104.52.x"
ifconfig_em0="inet 218.104.52.x netmask 255.255.255.248"
ifconfig_fxp0="inet 192.168.10.254 netmask 255.255.255.0"
inetd_enable="YES"
kern_securelevel_enable="NO"
linux_enable="YES"
nfs_reserved_port_only="YES"
sendmail_enable="NONE"
sshd_enable="YES"
usbd_enable="NO"
2、配置/etc/resolv.conf:
domain jscpu.com
nameserver 218.104.48.106
nameserver 221.6.4.66
3、将光盘放入光驱中,安装ports和src
# /usr/sbin/sysinstall
然后选择Configure–>Distributions,然后利用空格键选择src和ports两项,点install,安装完成后重启机器。
三、配置内核
# cd /usr/src/sys/i386/conf
# cp GENERIC funpower
# ee funpower
内核根据服务器的不同具体配置。
编辑好funpower后开始编译安装内核:
#/usr/sbin/config funpower
#cd ../compile/funpower
#make cleandepend
#make depend
#make
#make intall
编译安装完成后重启机器。
四、安装squid服务
1、安装perl(freebsd5.4以后要先安装perl后再安装squid)
从http://www.cpan.org/authors/id/R/RG/RGARCIA/下载perl-5.6.2.tar.gz,然后拷贝到/usr/ports/distfiles中,然后:
# cd /usr/ports/lang/perl5
# make install
2、下载并安装squid
从http://www.squid-cache.org/Versions/v2/2.5/下载squid最新版squid-2.5.STABLE12.tar.gz,通过ftp上传至服务器目录中。
<安装>
# cd /home/funpower
# tar zxvf squid-2.5.STABLE12.tar.gz
# cd squid-2.5.STABLE7
# ./configure –prefix=/usr/local/squid
# make
# make install
<配置squid配置文件>
# cd /usr/local/squid/etc
# ee squid.conf
配置文件中改如下几项:
http_port 3128 //56行
cache_mem 128 MB //490行
cache_dir ufs /usr/local/squid/cache 1024 16 256 //705行
cache_access_log /dev/null //712
cache_log /dev/null //720
cache_store_log none //730
配置文件中加入以下几项:
acl web src 192.168.10.254 //在1830行左右acl all src 0.0.0.0/0.0.0.0这行前加入
http_access allow web //在1890行左右的http_access deny all这行前加入
在配置文件开头加入以下四行:
visible_hostname jifangproxy.jscpu.com
cache_mgr [email protected]
cache_effective_user squid
cache_effective_group squid
<添加用户及组及目录权限的修改>
# pw groupadd squid
# pw adduser squid –g squid –s /nonexistent
# mkdir /usr/local/squid/cache
# chown –R squid /usr/local/squid/cache
# chgrp –R squid /usr/local/squid/cache
# chown –R squid /usr/local/squid/var/logs
# chgrp –R squid /usr/local/squid/var/logs
<创建初始cache目录>
# /usr/local/squid/sbin/squid –Z
运行测试squid,如果运行后没有error之类的错误,用top命令能看到squid进程的话,说明安装成功:
# cd /usr/local/squid/sbin
# ./squid
<建立squid启动脚本(随系统一起启动)>
# ee /etc/rc.local
加入如下一行,然后保存退出:
/usr/local/squid/sbin/squid
重启服务器。
五、安装socks5服务
1、下载并安装socks5
从北大天网上下载socks5-v1.0r11.tar.gz,大小为401.093KB(我提供的这个就是),然后通过FTP拷贝到服务器上,然后:
# cd /home/funpower
# cp socks5-v1.0r11.tar.gz /usr/ports/distfiles
<查看distinfo>
# cd /usr/ports/net/socks5
#more distinfo
显示如下:
MD5 (socks5-v1.0r11.tar.gz) = 9d6db7d3c425bbafb8c8d67e128eedfe
SIZE (socks5-v1.0r11.tar.gz) = 401093
查看SIZE的大小是否和刚才下载的大小一样(401.093KB)
<开始安装>
# cd /usr/ports/net/socks5
# make install
2、配置socks5
# cd /usr/local/etc
# ee socks5.conf
<内容如下>
auth – – –
permit – – 192.168. – – –
set SOCKS5_NOIDENT
set SOCKS5_V4SUPPORT
保存退出,重启服务器。
然后通过QQ的测试连接测试你服务器HTTP的3128端口和SOCKS5的1080端口。
作者:老管 email:[email protected]
参考文章:在Linux上配置和实现SOCKS v5 在FreeBSD上安装Squid


