Author Archive

FreeBSD 7.0-BETA2发布

4 November: The FreeBSD 7.0 release process proceeds and as a consequence the 7.0-BETA2 ISO images for Tier-1 architectures are now available for download on most FreeBSD mirror sites. We ask our users to report any outstanding bugs, as this will presumably be the last BETA release before the first RC release.

下载地址:ftp://ftp.FreeBSD.org/pub/FreeBSD/ISO-IMAGES-i386/7.0/

OpenBSD4.2Release发布

FreeBSD-6.2Release+Squid-2.6架设上网二级代理服务器

二级上网代理服务器,用的很少,不过有时你想控制局域网中一小部分的机器的上网,就用的上。前两天架设了一台二级代理,写个笔记。

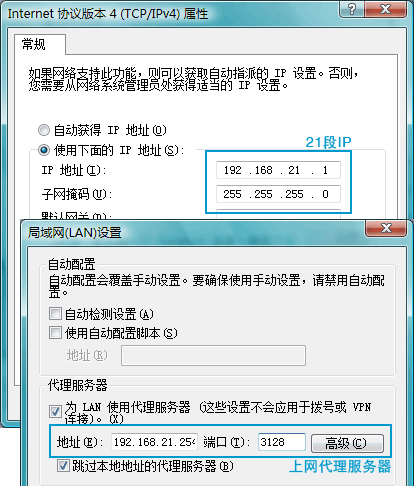
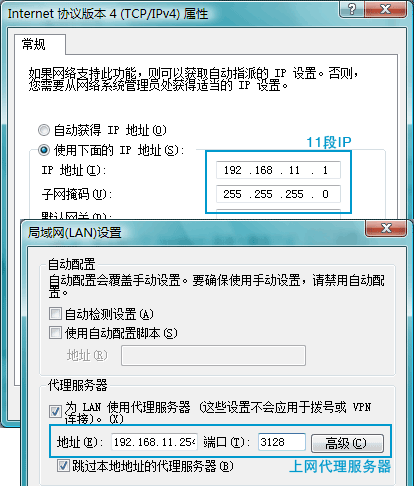
如下图, 一级和二级代理服务器都使用FreeBSD6.2Release+Squid2.6,一级代理直接和外网线路连接,用户通过设置相应的网段IP和代理服务器(IE上设置)进行上网。一级代理服务器后面的交换上的用户直接设置21段的IP再加上在IE上设置192.168.21.254及端口3128进行上网;二级代理后面的用户就要设置11段的IP加上192.168.11.254及端口3128进行上网。

freebsdsquiddeer.gif

============================================

一、一级代理服务器的架设

说明:

操作系统:FreeBSD6.2Release

代理软件:Squid2.6STABLE16

外网卡:em0 -> 218.90.159.xxx (默认网关为上一级ISP提供)

内网卡:em1 -> 192.168.21.254

1、FreeBSD的安装及优化

(1)最小化安装FreeBSD6.2RELEASE

(2)配置rc.conf

hostname="one.www.com"
defaultrouter="218.90.159.xxx"
ifconfig_em0="inet 218.90.159.xxx netmask 255.255.255.xxx" //外网IP
ifconfig_em1="inet 192.168.21.254 netmask 255.255.255.0" //内网IP
sendmail_enable="NONE"
inetd_enable="YES"
linux_enable="YES"
sshd_enable="YES"
usbd_enable="YES"

(3)配置内核:

newproxy# cd /usr/src/sys/i386/conf
newproxy# cp GENERIC funpower
newproxy# ee funpower

修改内核配置文件,将不需要的选项(如网卡)之类的前面打#,然后按esc并按a保存退出,再执行:

newproxy# /usr/sbin/config funpower
newproxy# cd ../compile/funpower
newproxy# make cleandepend
newproxy# make depend
newproxy# make
newproxy# make install

2、squid的安装

(1)安装perl

newproxy# cd /usr/ports/lang/perl5
newproxy# make install

(2)下载并安装squid

从http://www.squid-cache.org/Versions/v2/2.6/下载squid-2.6.STABLE16.tar.gz并通过FTP放置服务器目录中/home/funpower,然后开始解压安装:

newproxy# cd /home/funpower
newproxy# tar zxvf squid-2.6.STABLE16.tar.gz
newproxy# cd squid-2.6.STABLE16
newproxy# ./configure –prefix=/usr/local/squid
newproxy# make
newproxy# make install

(3)配置squid.conf

newproxy# cd /usr/local/squid/etc
newproxy# ee squid.conf

内容如下:

acl web src 192.168.21.0/24
acl all src 0.0.0.0/0.0.0.0
acl manager proto cache_object
acl localhost src 127.0.0.1/255.255.255.255
acl to_localhost dst 127.0.0.0/8
acl SSL_ports port 443
acl Safe_ports port 80 # http
acl Safe_ports port 21 # ftp
acl Safe_ports port 443 # https
acl Safe_ports port 70 # gopher
acl Safe_ports port 210 # wais
acl Safe_ports port 1025-65535 # unregistered ports
acl Safe_ports port 280 # http-mgmt
acl Safe_ports port 488 # gss-http
acl Safe_ports port 591 # filemaker
acl Safe_ports port 777 # multiling http
acl CONNECT method CONNECT
http_access allow manager localhost
http_access deny manager
http_access deny !Safe_ports
http_access deny CONNECT !SSL_ports
http_access allow web
http_access deny all
icp_access allow all
http_port 3128
hierarchy_stoplist cgi-bin ?
acl QUERY urlpath_regex cgi-bin ?
cache deny QUERY
cache_mem 64 MB
cache_dir ufs /usr/local/squid/cache 7000 16 256
access_log /dev/null
cache_log /dev/null
cache_store_log none
refresh_pattern ^ftp: 1440 20% 10080
refresh_pattern ^gopher: 1440 0% 1440
refresh_pattern . 0 20% 4320
acl apache rep_header Server ^Apache
broken_vary_encoding allow apache
cache_mgr [email protected]
cache_effective_user squid
cache_effective_group squid
visible_hostname one.www.com

(4)创建用户及缓存等:

newproxy# pw groupadd squid
newproxy# pw adduser squid -g squid -s /nonexistent
newproxy# mkdir /usr/local/squid/cache
newproxy# chown -R squid /usr/local/squid/cache
newproxy# chgrp -R squid /usr/local/squid/cache
newproxy# chown -R squid /usr/local/squid/var/logs
newproxy# chgrp -R squid /usr/local/squid/var/logs
newproxy# /usr/local/squid/sbin/squid -z
newproxy# cd /usr/local/squid/sbin
newproxy# ./squid
newproxy# ee /etc/rc.local

加入如下一行:

/usr/local/squid/sbin/squid

保存退出。

这样一级代理就设置完成,按照下图设置后就能联网络了。
ipproxyie.gif

============================================

二、二级代理服务器的架设

下来架设本文的着重点——二级代理,所使用的软件都一样,也是FreeBSD6.2Release+Squid2.6,而且安装FreeBSD的步骤和一级代理的也一样(只有内、外网卡的IP及网关不一样),唯独在配置Squid时配置文件有些不同,具体如下:

说明:

操作系统:FreeBSD6.2Release

代理软件:Squid2.6STABLE16

外网卡:xl0 -> 192.168.21.250 (这里的默认网关就应该是一级代理服务器的内网卡地址,为192.168.21.254)

内网卡:xl1 -> 192.168.11.254

1、安装FreeBSD

安装的具体步骤和上面一级代理的方法一样,只是在配置rc.conf时的IP不一样,如下:

hostname="two.www.com"
defaultrouter="192.168.21.254" //一级代理的内网卡地址
ifconfig_xl0="inet 192.168.21.250 netmask 255.255.255.0" //外网IP
ifconfig_xl1="inet 192.168.11.254 netmask 255.255.255.0" //内网IP
sendmail_enable="NONE"
inetd_enable="YES"
linux_enable="YES"
sshd_enable="YES"
usbd_enable="YES"

2、安装Squid2.6

同样,安装方法和上面一级代理的一样,只是在配置squid的配置文件squid.conf不一样。增加了两行内容,如下:

acl web src 192.168.11.0/24
cache_peer 192.168.21.254 parent 3128 3130 proxy-only //定义父代理(也就是上一级代理)的IP及上网端口3128
acl all src 0.0.0.0/0.0.0.0
acl manager proto cache_object
acl localhost src 127.0.0.1/255.255.255.255
acl to_localhost dst 127.0.0.0/8
acl SSL_ports port 443
acl Safe_ports port 80 # http
acl Safe_ports port 21 # ftp
acl Safe_ports port 443 # https
acl Safe_ports port 70 # gopher
acl Safe_ports port 210 # wais
acl Safe_ports port 1025-65535 # unregistered ports
acl Safe_ports port 280 # http-mgmt
acl Safe_ports port 488 # gss-http
acl Safe_ports port 591 # filemaker
acl Safe_ports port 777 # multiling http
acl CONNECT method CONNECT
http_access allow manager localhost
http_access deny manager
http_access deny !Safe_ports
http_access deny CONNECT !SSL_ports
http_access allow web
never_direct allow all //所有请求转发至父代理上
http_access deny all
icp_access allow all
http_port 3128
hierarchy_stoplist cgi-bin ?
acl QUERY urlpath_regex cgi-bin ?
cache deny QUERY
cache_mem 64 MB
cache_dir ufs /usr/local/squid/cache 7000 16 256
access_log /dev/null
cache_log /dev/null
cache_store_log none
refresh_pattern ^ftp: 1440 20% 10080
refresh_pattern ^gopher: 1440 0% 1440
refresh_pattern . 0 20% 4320
acl apache rep_header Server ^Apache
broken_vary_encoding allow apache
cache_mgr [email protected]
cache_effective_user squid
cache_effective_group squid
visible_hostname two.jscpu.com

这样二级代理也架设完成,按照如下的设置二级代理服务器后的用户应该就也可以上网了。
ipproxyie2.gif

总结:架设二级代理时,个人感觉最重要的还是要搞清楚一、二级代理四块网卡的IP,至于架设方法,和一级代理没啥区别,最主要的是squid.conf中增加了二行内容 。

by funpower, 2007-10-31 23:42。

blog程序wordpress升级至2.3.1,并增加留言“验证码”功能

1、升级blog程序

花了些时间,将blog程序wordpress升级至2.3.1版,这次升级很顺利,上次想从2.2.1升级至2.3,没成功,就干脆没升级。我使用的是www.wordpress.org.cn上的2.3.1中文版,升级步骤也是按安装包中的readme.html来进行的,如下:

从任何较早版本的 WordPress 升级到 2.3:
(1)备份你修改过的文件,并删除所有旧的 WordPress 文件。
(2)上传所有新文件。
(3)在浏览器中打开 /wp-admin/upgrade.php 。
(4)升级完成。

2、给留言增加“验证码”功能

最近的垃圾回复实在太多,又不想每天删,就干脆找了个“验证码”插件安装。

(1)下载插件wp-imgcode.zip,解压缩后上传至wp-content/plugins目录。
(2)转到后台管理的插件页面,启用该插件。
(3)再转到后台管理的外观页面,修改当前使用模版的comments.php文件(我使用的是K2模板),在文件的最后有这样几行:

<?php if (function_exists('show_subscription_checkbox'))
{ show_subscription_checkbox(); } ?>
<?php if (function_exists('quoter_page')) { quoter_page(); } ?>

<p><input name="submit" type="submit" id="submit" tabindex="5"
value="<?php _e('Submit','k2_domain'); ?>" />
<input type="hidden" name="comment_post_ID" value="
<?php echo $id; ?>" /></p>

<?php do_action('comment_form', $post->ID); ?>

<div class="clear"></div>

将<?php do_action('comment_form', $post->ID); ?>这行位置往前放,修改成:

 <?php if (function_exists('show_subscription_checkbox'))
{ show_subscription_checkbox(); } ?>
<?php if (function_exists('quoter_page')) { quoter_page(); } ?>

<?php do_action('comment_form', $post->ID); ?>

<p><input name="submit" type="submit" id="submit" tabindex="5"
value="<?php _e('Submit','k2_domain'); ?>" />
<input type="hidden" name="comment_post_ID" value="
<?php echo $id; ?>" /></p>
<div class="clear"></div>

然后保存修改的页面。

(4)安装成功后回复框中就会多出一行,如下图:

yzbphp.gif

FreeBSD 7.0-BETA1.5测试版本发布

发表: delphij
时间: 2007/10/26 06:44:10由于操作失误,本月早些时候发布的7.0-BETA1实际上是一份8.0-CURRENT的快照版本。发布工程租的Ken Smith根据新的RELENG_7发布了7.0-BETA1.5。

下载地址:ftp://ftp.freebsd.org/pub/FreeBSD/ISO-IMAGES-i386/7.0/

Gmail支持IMAP邮件接收

刚发现,Gmail支持了IMAP邮件接收,像我这样一天垃圾邮件上百封的最合适了。因为IMAP的最大特点就是可以根据你设定的一些条件(比如收件人等)来选择性的收取部分邮件。

IMAP网上定义:

IMAP是Internet Message Access Protocol的缩写,是用于访问服务器上所存储的邮件的Internet协议。同POP3相比,IMAP提供的邮件“摘要浏览”方式极大地提高了邮件浏览速度,可有效地节省客户宝贵的时间。这对于经常接收大量邮件和希望阻止垃圾邮件的用户来说此功能是非常实用的。用户建立IMAP帐号后,可以指定哪些文件夹 显示,哪些文件夹隐藏,利用IMAP提供的摘要浏览功能使用户在阅读完所有邮件的到达时间、发件人、主题、大小等信息后才做出是否下载的决定,同时还可以享受选择性下载附件的决定,比如:用户收到了一封有3个附件的信件, 用户可以根据自己的需要只下载其中的1个,从而节省了大量的宝贵时间,避免了使用POP3方式收信时必须将邮件全部收到本地后才能进行判断的被动。

Google Gmail IMAP设置方法

截图:

gmailimap.gif

FreeBSD新闻


1、FreeBSD 6.2-RELEASE支持时间延长四个月

发表: delphij
时间: 2007/10/22 14:16:48

近日,FreeBSD安全长官Colin Percival宣布,将FreeBSD 6.2-RELEASE的支持时间延长4个月,即延长至2008年5月31日。此举的主要目的是为了给尚在观望FreeBSD 7.0-RELEASE及6.3-RELEASE的用户留出更多的时间来评估其潜在影响。

根据目前的开发进展情况,FreeBSD 6.3-RELEASE和7.0-RELEASE均会在今年年底发布。

2、FreeBSD 7.0-BETA1测试版本发布,及6.3-BETA1以及发行版发布计划

下载地址:ftp://ftp.freebsd.org/pub/FreeBSD/releases/i386/ISO-IMAGES/7.0/

发表: delphij
时间: 2007/10/23 14:39:53

FreeBSD发布工程组今天发布了FreeBSD 7.0-BETA1。为了尽可能减少发布过程所需的ports冻结的影响,本次7.0-RELEASE将与6.3-RELEASE采取交叉的发布周期。

目前,我们的计划是将7.0和6.3版本的BETA/RC交叉发布,大致日期如下:

7.0-BETA1、BETA2、RC1、RC2、RELEASE:10月17日、10月31日、11月14日、11月28日、12月12日。
6.3-BETA1、BETA2、RC1、RC2、RELEASE:10月24日、11月7日、11月21日、12月5日、12月19日。

明天的RELENG_6将被命名为6.3-PRERELEASE,以体现6.3-RELEASE发布工程周期的开始。

与先前的FreeBSD版本类似,这个日程表只是初步的时间规划。目前,RELENG_6已经十分成熟,因此日期可能会比较准确;而作为新分支的7.0则有很可能会存在延期的现象。

7.0-BETA1版本目前已经可以从一些 FreeBSD 镜像站点下载。您也可以源代码方式升级。关于使用 FreeBSD Update将现有的 FreeBSD 6.x 系统升级至 7.0-BETA1 的方法,将在稍后发表在 freebsd-stable 邮件列表。

FreeBSD6.2-RELEASE+Squid-2.6.STABLE16代理架设及性能优化笔记[未完]

说明:最近发现几台squid代理在高负载下的性能不是很好,有时甚至造成网络时断时续,所以这次特意重新架设,在架设过程中注重“优化”,这里当然包括操作系统FreeBSD本身的一些优化和代理软件squid的优化。本文只是初步先将代理架设完成,还没完,我将继续对squid进行优化。另外,这次在安装squid的最新稳定版squid-2.6.STABLE16时,发现配置文件中squid.conf中acl那一段放在了最前面,作者应该是考虑到那是必配项,方面使用者配置:)。

logo-red.png

img4.gif

=======================================================

一、FreeBSD的安装及优化

1、最小化安装FreeBSD6.2RELEASE

2、配置内核:

newproxy# cd /usr/src/sys/i386/conf
newproxy# cp GENERIC funpower
newproxy# ee funpower

修改内核配置文件,将不需要的选项(如网卡)之类的前面打#,然后按esc并按a保存退出,再执行:

newproxy# /usr/sbin/config funpower
newproxy# cd ../compile/funpower
newproxy# make cleandepend
newproxy# make depend
newproxy# make
newproxy# make install

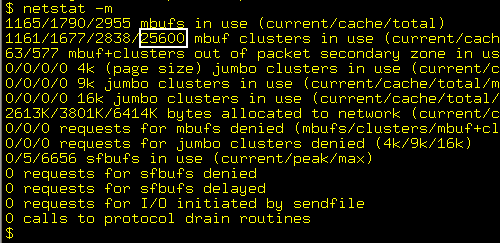
3、调整“Mbuf Clusters”

FreeBSD6.2RELEASE默认的Mbuf Clusters的默认值为25600,

bsdsquidnew1.gif

将它修改成51200,执行如下:

newproxy# cd /boot/defaults
newproxy# ee loader.conf

找到#kern.ipc.nmbclusters=””,将其改为kern.ipc.nmbclusters=”51200″,注意将前面的#要去掉,保存退出。

4、调整“临时端口”范围

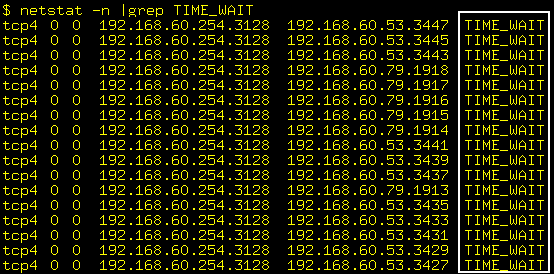
squid要与另一台服务器建立连接,内核就要分配一个临时端口来建立连接,这些临时端口在FreeBSD6.2RELEASE有一个范围,默认为49152–>65535,显然,对于繁忙的服务器,性能将会受到影响。因为一些TCP连接会被它们关闭并进入TIME_WAIT状态,而且当这些连接进入TIME_WAIT状态时,如下图:

bsdsquidnew2.gif

所以对于负载大的服务器(比如每秒有上百个连接)此端口范围应该扩大,将sysctl -w net.inet.ip.portrange.first=30000命令放入/etc/rc.local,就可以将临时端口范围修改为30000–>65535。当然,如果你想调整65535这个数值,就使用net.inet.ip.portrange.last命令。这里我只调整了net.inet.ip.portrange.first的数值。

5、重启机器。

二、squid的安装

1、安装perl

newproxy# cd /usr/ports/lang/perl5
newproxy# make install

2、下载并安装squid

http://www.squid-cache.org/Versions/v2/2.6/下载squid-2.6.STABLE16.tar.gz并通过FTP放置服务器目录中/home/funpower,然后开始解压安装:

newproxy# cd /home/funpower
newproxy# tar zxvf squid-2.6.STABLE16.tar.gz
newproxy# cd squid-2.6.STABLE16
newproxy# ./configure –prefix=/usr/local/squid
newproxy# make
newproxy# make install

3、配置squid.conf

newproxy# cd /usr/local/squid/etc
newproxy# ee squid.conf

内容如下:

acl web src 192.168.60.0/24
acl all src 0.0.0.0/0.0.0.0
acl manager proto cache_object
acl localhost src 127.0.0.1/255.255.255.255
acl to_localhost dst 127.0.0.0/8
acl SSL_ports port 443
acl Safe_ports port 80 # http
acl Safe_ports port 21 # ftp
acl Safe_ports port 443 # https
acl Safe_ports port 70 # gopher
acl Safe_ports port 210 # wais
acl Safe_ports port 1025-65535 # unregistered ports
acl Safe_ports port 280 # http-mgmt
acl Safe_ports port 488 # gss-http
acl Safe_ports port 591 # filemaker
acl Safe_ports port 777 # multiling http
acl CONNECT method CONNECT
http_access allow manager localhost
http_access deny manager
http_access deny !Safe_ports
http_access deny CONNECT !SSL_ports
http_access allow web
http_access deny all
icp_access allow all
http_port 3128
hierarchy_stoplist cgi-bin ?
acl QUERY urlpath_regex cgi-bin ?
cache deny QUERY
cache_mem 64 MB
cache_dir ufs /usr/local/squid/cache 7000 16 256
access_log /dev/null
cache_log /dev/null
cache_store_log none
refresh_pattern ^ftp: 1440 20% 10080
refresh_pattern ^gopher: 1440 0% 1440
refresh_pattern . 0 20% 4320
acl apache rep_header Server ^Apache
broken_vary_encoding allow apache
cache_mgr [email protected]
cache_effective_user squid
cache_effective_group squid
visible_hostname jiulongproxynew.jscpu.com

4、创建用户及缓存等:

newproxy# pw groupadd squid
newproxy# pw adduser squid -g squid -s /nonexistent
newproxy# mkdir /usr/local/squid/cache
newproxy# chown -R squid /usr/local/squid/cache
newproxy# chgrp -R squid /usr/local/squid/cache
newproxy# chown -R squid /usr/local/squid/var/logs
newproxy# chgrp -R squid /usr/local/squid/var/logs
newproxy# /usr/local/squid/sbin/squid -z
newproxy# cd /usr/local/squid/sbin
newproxy# ./squid
newproxy# ee /etc/rc.local

加入如下一行:
/usr/local/squid/sbin/squid
保存退出。

5、优化squid

???

设置锐捷S6506交换机监控端口(一对多监控)

当一个端口需要监控二个以上端口时,就要给交换机设置一对多监控配置了。

以锐捷S6506交换机为例,端口设置为:模块1的2口为监控端口(1/2)、模块1的4口为被监控端口1(1/4)、模块1的16端口为被监控端口2(1/16),操作步骤如下:

s6506> en
Password:
s6506# conf
s6506(config)# no monitor session 1
s6506(config)# monitor session 1 destination interface gig 1/2    //监控端口
s6506(config)# monitor session 1 source interface gig 1/4    //被监控端口1
s6506(config)# monitor session 1 source interface gig 1/16   //被监控端口2
s6506(config)# exit
s6506# wr

FreeBSD 7-STABLE分支正式创建

发表: delphij
时间: 2007/10/11 13:26:11

作为 FreeBSD 7.0-RELEASE 之前的一项重要步骤,今天 FreeBSD 正式创建了 7-STABLE 分支 (RELENG_7)。

目前 CVS -HEAD 上的版本已正式改名为 8.0-CURRENT。依照惯例,从现在开始到最终发布7.0-RELEASE仍然需要至少8周的时间。

请注意,目前 7-STABLE 分支还不适合在生产环境大规模使用,在接下来的 Release Cycle 过程中我们将继续对其进行测试和排错工作。请有条件的同学开始测试 RELENG_7 分支,并提交错误报告(最好有patch 🙂 )