FreeBSD新闻
1、FreeBSD 6.3-RC1(下载)已发布。
2、由于在测试过程中发现的问题,决定在7.0发布周期中新增加两个 BETA build:BETA3和BETA4,以便进一步排查问题;FreeBSD 7.0-RELEASE的预计发布时间,由2007年12月17日推迟至2008年1月14日。
Author Archive
1、FreeBSD 6.3-RC1(下载)已发布。
2、由于在测试过程中发现的问题,决定在7.0发布周期中新增加两个 BETA build:BETA3和BETA4,以便进一步排查问题;FreeBSD 7.0-RELEASE的预计发布时间,由2007年12月17日推迟至2008年1月14日。
有段rm格式的声音要转换为mp3,昨晚找了很久都没找到合适的,不是要注册就是要什么RM辅助的支持,今天早上起来找了下,很顺利——AVI-MPEG-WMV-RM to MP3 Converter(下载)。我转换一段1个小时的RM声音文件大概花了8分钟,速度还行。

最近校园网上好几次都出现ARP包堵塞的情况,昨天在网上发现吉大网络中心的通知——[吉林大学公告慎用瑞星2008防火墙],今天也看到了瑞星对吉林的回应。人民网信息。
自己想实验一下。特地从瑞星官网上下载了瑞星个人防火墙2008,然后安装,默认安装防火墙是不开ARP的,如下图:

安装完后,启动防火墙,然后选择菜单[设置]->[详细设置]->[ARP欺骗防御],打开此功能,不过正如瑞星的回应中所说,默认情况下[防御范围]是[防护指定的计算机地址和静态规则地址],很多人可能是自己手动修改成[防护局域网中的所有计算机](只有选择此功能才会出现ARP包堵塞情况),如下图:

安装完后我就开始用Wireshark进行抓包分析,发现没有异常情况,就继续测试使用,我是早上9点左右安装测试的,到下午1点40分左右再用Wireshark进行抓包,就抓到了我的机器128.0.0.1在局域网上发送着大量的ARP包,如下图:

然后我立即把瑞星个人防火墙2008退出,再用Wireshark测试,ARP包立即回到正常情况,如下图:

一台计算机不能上网,IP及其它配置都正常,ping网关也能ping通,不过ping的显示中多了个“?”符号,如下图:

判断了一下,应该和我以前遇到的“Unable to initialize Windows Sockets interface错误”情况差不多,于是使用netsh命令修复了一下winsocks,重启后故障清除,当然也可以使用WinSockxpfix软件修复,具体如下:
第一种方法:使用netsh命令(netsh winsock reset):

第二种方法:使用WinSockxpfix软件修复(下载),点击下图中的[Fix]即可:

如果不出意外,FreeBSD 7.0-BETA3将是RC1之前的最后一个BETA版本。FreeBSD7.0RELEASE估计将在12月中旬发布。
下载地址:
ftp://ftp.FreeBSD.org/pub/FreeBSD/ISO-IMAGES-i386/7.0/7.0-BETA3-i386-disc1.iso
ftp://ftp.FreeBSD.org/pub/FreeBSD/ISO-IMAGES-i386/7.0/7.0-BETA3-i386-disc2.iso
ftp://ftp.FreeBSD.org/pub/FreeBSD/ISO-IMAGES-i386/7.0/7.0-BETA3-i386-bootonly.iso
架设一台代理,提供对外网用户的代理请求,端口仍然为3128,加入Squid认证功能。这样可以保证只提供给某些你信任的用户该服务。架设过程和架设对内网用户提供服务的过程基本相同,只是在编译安装squid时和squid的配置文件squid.conf有些不同。这次架设的服务器将保留对内网用户提供squid服务(内网用户不增加认证功能限制)的同时再增加对外网用户提供squid+认证功能。版本为FreeBSD6.2-RELEASE+Squid2.6-STABLE12。
服务器及网络信息:
外网网卡:em0;外网ip:221.6.117.50/255.255.255.240
内网网卡:em1;内网ip:128.0.0.4/255.255.252.0
架设过程:
一、FreeBSD的安装
1、最小化安装FreeBSD6.2RELEASE
2、配置内核:
jiulongproxynew# cd /usr/src/sys/i386/conf
jiulongproxynew# cp GENERIC funpower
jiulongproxynew# ee funpower
修改内核配置文件,将不需要的选项(如网卡)之类的前面打#,然后按esc并按a保存退出,再执行:
jiulongproxynew# /usr/sbin/config funpower
jiulongproxynew# cd ../compile/funpower
jiulongproxynew# make cleandepend
jiulongproxynew# make depend
jiulongproxynew# make
jiulongproxynew# make install
3、配置/etc/rc.conf:
hostname="jiulongproxynew.jscpu.com"

defaultrouter="221.6.117.97"

ifconfig_em0="inet 221.6.117.50 netmask 255.255.255.240"

ifconfig_em1="inet 128.0.0.4 netmask 255.255.252.0"

sendmail_enable="NONE"

inetd_enable="YES"

linux_enable="YES"

sshd_enable="YES"

usbd_enable="YES"
4、配置resolv.conf:
jiulongproxynew# cd /etc
jiulongproxynew# ee resolv.conf
添加如下两行:
nameserver 221.6.96.177

nameserver 221.6.96.178
5、重启服务器
二、squid的安装
1、安装perl以支持squid
jiulongproxynew# cd /usr/ports/lang/perl5
jiulongproxynew# make install
2、安装Apache,squid认证用户设置密码时使用apache的密码管理程序htpasswd
jiulongproxynew# cd /usr/ports/www/apache13
jiulongproxynew# make install
3、下载并安装squid
从http://www.squid-cache.org/Versions/v2/2.6/下载squid-2.6.STABLE16.tar.gz并通过FTP放置服务器目录中/home/funpower,然后开始解压安装:
jiulongproxynew# cd /home/funpower
jiulongproxynew# tar zxvf squid-2.6.STABLE16.tar.gz
jiulongproxynew# cd squid-2.6.STABLE16
jiulongproxynew# ./configure –prefix=/usr/local/squid –enable-auth=”basic” –enable-basic-auth-helpers=”NCSA”
jiulongproxynew# make
jiulongproxynew# make install
3、配置squid和创建认证用户及密码
将ncsa_auth拷贝至可执行目录/usr/sbin
jiulongproxynew# cd /home/funpower/squid-2.6.STABLE16
jiulongproxynew# cd helpers/basic_auth/NCSA/
jiulongproxynew# cp ncsa_auth /usr/sbin
创建squid认证用户www
jiulongproxynew# /usr/local/bin/htpasswd -c /usr/local/squid/etc/password www
New password:
Re-type new password:
Adding password for user www
输入www两遍密码后出现上面的信息就说明用户创建成功。
4、配置squid.conf
jiulongproxynew# cd /usr/local/squid/etc
jiulongproxynew# ee squid.conf
内容如下:
auth_param basic program /usr/sbin/ncsa_auth /usr/local/squid/etc/password

auth_param basic children 5

auth_param basic realm Please enter the user name and password

auth_param basic credentialsttl 2 hours
acl web src 128.0.0.0/22  //内网ip段定义

acl all src 0.0.0.0/0.0.0.0  //外网ip段定义

acl all1 proxy_auth REQUIRED  //定义all1字段为需要认证

acl manager proto cache_object

acl localhost src 127.0.0.1/255.255.255.255

acl to_localhost dst 127.0.0.0/8

acl SSL_ports port 443

acl Safe_ports port 80          # http

acl Safe_ports port 21          # ftp

acl Safe_ports port 443         # https

acl Safe_ports port 70          # gopher

acl Safe_ports port 210         # wais

acl Safe_ports port 1025-65535  # unregistered ports

acl Safe_ports port 280         # http-mgmt

acl Safe_ports port 488         # gss-http

acl Safe_ports port 591         # filemaker

acl Safe_ports port 777         # multiling http

acl CONNECT method CONNECT
#deny bbs

acl bbs url_regex -i bbs

http_access deny bbs
#deny baidu post

acl baidupost dstdom_regex post.baidu.com

acl baidupost2 dstdomain post.baidu.com

http_access deny baidupost

http_access deny baidupost2
http_access allow manager localhost

http_access deny manager

http_access deny !Safe_ports

http_access deny CONNECT !SSL_ports

http_access allow web  //定义内网ip段为允许通过

http_access allow all all1  //定义外网ip段为允许通过,但需要认证,因为加了all1字段

icp_access allow all

http_port 3128

http_port 221.6.117.x:3128  //增加一个对本机外网地址的3128端口

hierarchy_stoplist cgi-bin ?

acl QUERY urlpath_regex cgi-bin ?

cache deny QUERY

cache_mem 64 MB

cache_dir ufs /usr/local/squid/cache 7000 16 256

access_log /dev/null

cache_log /dev/null

cache_store_log none

refresh_pattern ^ftp:           1440    20%     10080

refresh_pattern ^gopher:        1440    0%      1440

refresh_pattern .               0       20%     4320

acl apache rep_header Server ^Apache

broken_vary_encoding allow apache

cache_mgr [email protected]

cache_effective_user squid

cache_effective_group squid

visible_hostname jiulongproxynew.jscpu.com
4、创建用户及缓存等:
jiulongproxynew# pw groupadd squid
jiulongproxynew# pw adduser squid -g squid -s /nonexistent
jiulongproxynew# mkdir /usr/local/squid/cache
jiulongproxynew# chown -R squid /usr/local/squid/cache
jiulongproxynew# chgrp -R squid /usr/local/squid/cache
jiulongproxynew# chown -R squid /usr/local/squid/var/logs
jiulongproxynew# chgrp -R squid /usr/local/squid/var/logs
jiulongproxynew# /usr/local/squid/sbin/squid -z
jiulongproxynew# cd /usr/local/squid/sbin
jiulongproxynew# ./squid
jiulongproxynew# ee /etc/rc.local
加入如下一行:
/usr/local/squid/sbin/squid
保存退出。
5、重启服务器
三、客户端的设置及上网演示
1、内网用户
内网用户因为没有增加squid代理的认证功能,所以上网设置不变,只需在IE浏览器中设置服务器内网网卡地址128.0.0.4及3128端口即可。如下图:

2、外网(家庭)用户
外网用户,一般是家中,在使用该代理,需将IE上的代理服务器地址设置为该服务器的外网网卡地址221.6.117.50,端口仍为3128。如下图:

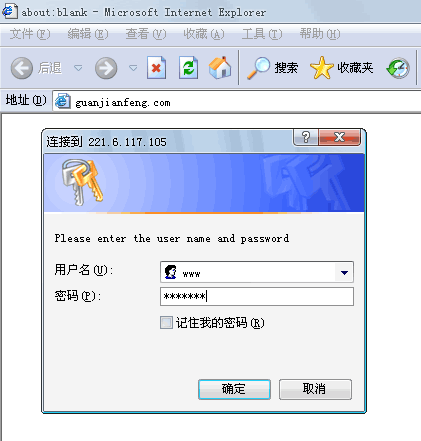
设置完后,在IE上打开任一网址,即会跳出一认证对话框,如下图,输入刚才创建的www用户及密码,若能访问该网站,及该服务器架设正确。
在FreeBSD上安装完squid,squid.conf中添加如下条目可以过滤一些“关键字”和“DOMAIN”:
http_port 3128

hierarchy_stoplist cgi-bin ?

acl QUERY urlpath_regex cgi-bin ?

cache deny QUERY

acl apache rep_header Server ^Apache

broken_vary_encoding allow apache

cache_mem 128 MB

cache_dir ufs /usr/local/squid/cache 1024 16 256

access_log /dev/null

cache_log /dev/null

cache_store_log none

refresh_pattern ^ftp: 1440 20% 10080

refresh_pattern ^gopher: 1440 0% 1440

refresh_pattern . 0 20% 4320

acl all src 0.0.0.0/0.0.0.0

acl web src 172.16.1.0/24 172.16.2.0/24 172.16.3.0/24

acl manager proto cache_object

acl localhost src 127.0.0.1/255.255.255.255

acl to_localhost dst 127.0.0.0/8

acl SSL_ports port 443

acl Safe_ports port 80 # http

acl Safe_ports port 21 # ftp

acl Safe_ports port 443 # https

acl Safe_ports port 70 # gopher

acl Safe_ports port 210 # wais

acl Safe_ports port 1025-65535 # unregistered ports

acl Safe_ports port 280 # http-mgmt

acl Safe_ports port 488 # gss-http

acl Safe_ports port 591 # filemaker

acl Safe_ports port 777 # multiling http

acl CONNECT method CONNECT
#deny bbs

acl bbs url_regex -i bbs //过滤URL中出现"bbs"关键字

http_access deny bbs
#deny baidu post

acl baidupost dstdom_regex post.baidu.com    //过滤post.baiud.com域名

acl baidupost2 dstdomain post.baidu.com    //过滤post.baiud.com域名

http_access deny baidupost

http_access deny baidupost2
#deny qq

acl qq1 dstdom_regex tencent.com    //过滤*.tencent.com域名

acl qq2 dstdom_regex qq.com    //过滤*.qq.com域名

acl qq3 url_regex -i qq    //过滤URL中出现"qq"的关键字

acl qq4 url_regex -i tencent    //过滤URL中出现"tencent"的关键字

acl qq5 dstdomain qq.com    //过滤*.qq.com域名

acl qq6 dstdomain tencent.com    //过滤*.tencent.com域名

acl qqip dst "/usr/local/squid/etc/qq_ip"

http_access deny qq1

http_access deny qq2

http_access deny qq3

http_access deny qq4

http_access deny qq5

http_access deny qq6

http_access deny qqip
http_access allow manager localhost

http_access deny manager

http_access deny !Safe_ports

http_access deny CONNECT !SSL_ports

http_access allow web

http_access deny all
visible_hostname proxy5.jscpu.com

cache_mgr [email protected]

cache_effective_user squid

cache_effective_group squid

icp_access allow all


